No matter how fancy or expensive your sprayer is, you won’t get much accomplished unless you fill it up properly. Obviously, a sprayer won’t work without liquid in it, but there is more to it than just dumping in your pesticide and water. You also need to be able to fill it with the right ratio of water and pesticide/fertilizer, or whatever product you want to apply.
The mechanics of filling the sprayer may be simple, but the devil is in the details. In this article, I am going to cover it all. From getting the sprayer open and cleaning it, to finding out how much chemical to mix in the sprayer. So let’s look at the basics of filling your pump sprayer.
Basics of Filling Your Pump Sprayer
Here are the different aspects of filling a pump sprayer covered in this article. You can skip right to any section that you need:
- Safety
- Opening a pump sprayer
- Cleaning/removing residual chemical
- Leak check
- Choosing the right pesticide/fertilizer, etc.
- Diluting and mixing
- Fill Process
Filling a Pump Sprayer Video
Safety
I spray pesticides around my property so I have a private applicator license. To get this, I had to take a safety training course. This, plus my own experience handling pesticides leaves no doubt that you should take precautions.
No matter how careful you are, a change in the wind or an accidental splash is all it takes for an irritating chemical to do some damage to your skin or eyes. That’s why I highly recommend you take these safety steps seriously when adding any product/chemical to your sprayer.
Safety precautions when filling your sprayer:
- Wear chemical-resistant gloves
- Wear goggles
- Have access to fresh water (for flushing eyes, and washing hands)
- Breathing protection (if required by product label)
- Wear appropriate shoes: closed-toe, work boots, rubber boots, slip-on covers, etc.
- Wear Long pants
- Long sleeves recommended
- Follow the instructions on the product label
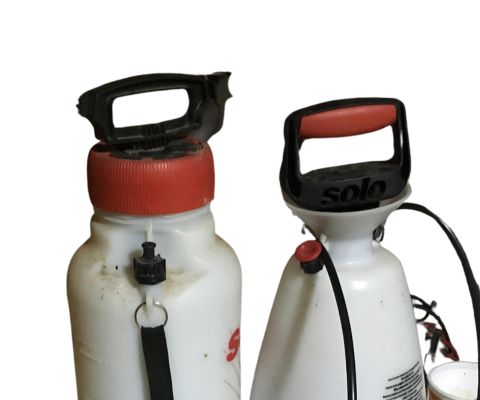
Opening Your Pump Sprayer
I don’t want to blow your mind, but to fill the sprayer, you will need to remove the lid. I know this may seem basic but, there are a couple of things that can cause issues: lid design and stuck lids.
While all lawn and garden pump sprayers (also called tank sprayers, hand sprayers, etc.) are pretty similar, every manufacturer designs their lid a bit differently. This means the way they open can vary. The handle used to pump up the sprayer is often integrated with the lid, so it is important to be gentle when possible to avoid damaging the sprayer.
On many models, the handle must be fully compressed and seated in place. Then you can turn the handle counterclockwise to unsrew it. Some other varieties have lids that you must grab and twist with two hands.
The other issue is stuck lids. Chemical residue, heat, or just plain over-tightening a lid can make it very hard to remove. There are many methods to employ when this problem arises. That is why I wrote a comprehensive guide that explains in detail how to open a pump sprayer lid, even when stuck.
Checking for Residual Chemicals
Before filling your pump sprayer with a new batch of chemicals, it is crucial to ensure that there are no leftovers from previous uses. Residual chemicals can contaminate your new mixture but they also pose a safety risk.
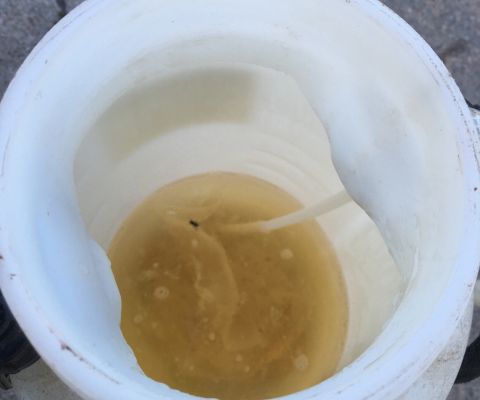
If the sprayer was previously used for applying any chemical, It is a good idea to triple-rinse the container/tank. This process (as you may have guessed) involves filling it with water three times, agitating it inside the tank, and then dumping it out.
You should also fill it with fresh water and work the pump handle to push the fresh water through the entire pump system. Then spray out the water so that you can clean out residual chemicals
You can also use soapy water or a tank cleaner to help get chemicals out of the tank. This is especially important if you have been spraying a pesticide or herbicide and now want to use the sprayer where that product could cause damage to plants. A tank cleaner will help you make sure it’s all gone.
For example, if you spray Roundup with your pump sprayer, then you want to spray a fertilizer on your garden, you want to make sure that all that all the residual Roundup is out of the tank. Otherwise, it would kill the plants in your garden.
As you can see, cleaning a tank sprayer is an important issue to get right. For a more detailed guide, be sure to read this article about cleaning a sprayer.
Assembly Check
While you are cleaning your sprayer it is a good opportunity to check for any leaks or fittings that may be loose. While you pressurize the sprayer to disperse the freshwater, you can check that there is no dripping anywhere.
If your sprayer has a leak or crack you’ll likely already know this but if you haven’t used the sprayer in a while it’s better to find out if there is a leak with just one water in the tank rather than with a pesticide or other expensive chemical.
Choosing the Right Chemicals
The type of chemical that you need to put in your sprayer depends on the job you want to accomplish. A pump sprayer can be used to apply a wide variety of different liquids. You can see a detailed list In this article I wrote about the different uses of a pump sprayer.
Selecting a Pesticide
One main product that is applied with a pump sprayer is a pesticide. The term pesticide refers to any liquid that is meant to repel or eliminate a pest. There are several different types of pesticides:
- Insecticides – Target insects like aphids and beetles.
- Herbicides – Used to control unwanted plants and weeds.
- Fungicides – Help manage plant diseases caused by fungi.
- Rodenticides – Aimed at controlling rodents
Here is the basic process you need to follow when selecting a pesticide:
1. Pest Identification
- Visual Inspection: Look for damage signs like holes in leaves or yellowing.
- Consult Experts: Reach out to local agricultural extensions or online forums for help.
- Use Resources: Books and websites on gardening and pest control can be invaluable
I have more information that is specific to spraying lawns where I reached out and got some guidance from my local extension office. You can read that guide in my beginner guide to spraying your lawn.
2. Assessing Environmental Factors
- Weather Conditions: Wind can carry pesticides away from the target area. Rain can wash them off before they act.
- Local Wildlife: Be mindful of beneficial insects and animals that could be affected.
- Plant Sensitivity: Some plants are more sensitive to certain chemicals. Always test a small area first
3. Research Products That fit Your Needs
You can find a lot of guidance from the pesticide sellers. They can offer advice on what products work best in various scenarios. If you look at this page on domyown.com, they walk you through pesticide selection. You start by selecting the pest you want to get rid of and go from there.
When choosing a pesticide be careful to consider these important factors:
- Chemical Type: Choose a pesticide that targets the specific vulnerabilities of the pest.
- Consider Active Ingredients: Choose based on the pest you need to control.
- Consider Formulations: Pesticides come in liquids, powders, granules, and more. Select one that best fits your application method.
- Application Method: Consider whether a spray, bait, or dust is most suitable based on the pest’s location and habits.
- Environment: Select pesticides that are effective in the specific environment where the infestation is present. For example, water-soluble pesticides are not ideal for rainy areas as they can be washed away.
- Safety: Choose pesticides that are least harmful to non-target organisms, including pets and beneficial insects like bees. Consider the potential impact on the surrounding ecosystem, including water sources and soil quality.
As mentioned earlier It is vital to read the labels. They provide critical information about how the pesticide works and its intended targets.
Selecting a Fertilizer
Another common use of a pump sprayer is the application of fertilizers. Selecting the right fertilizer is an important part of filling your sprayer. The process begins with understanding the various types of fertilizers available—complete, organic, synthetic, and specialty—and choosing one that matches the specific nutritional needs of your plants and the condition of your soil.
Typically it is best to conduct a soil test, which will inform you about nutrient deficiencies and pH levels, guiding your fertilizer selection. This test can usually be performed through local cooperative extension services or private laboratories, providing you with detailed insights about your soil.
For expert advice and more detailed guidance, consider reaching out to local agricultural extension offices, which offer resources and workshops on garden and lawn care.
Diluting the Chemicals
The most important aspect of filling your garden sprayer is making sure that you use the right amount of pesticide, fertilizer, or whatever you are spraying. You need to know the correct quantity of the pesticide/fertilizer to use and the correct ratio to dilute it with water.
The mix ratio will depend on the product you are spraying. It is essential to refer to the label on the container. This is not only a guide to get the best result but it is also the law. Using the product in a way inconsistent with any rate or application quantities is a violation.
You can read a more detailed explanation in my post on mixing and diluting Roundup.
Filling Your pump sprayer
Now let’s get down to the business of actually getting liquid in your sprayer. The mechanics are straightforward but there are a few key things to consider to ensure you do it safely and your spray solution will ultimately be effective.
Mixing and diluting pesticides in a garden sprayer is essential to maintaining a healthy garden. However, it is crucial to handle pesticides safely to protect yourself, your plants, and the environment. Here is a beginner’s guide with a step-by-step process:
1. Read the Label
You are probably tired of hearing this, but it is the most crucial step. Every pesticide comes with a label that contains information on its proper use, necessary precautions, and the right dilution rates. Look for information on how much pesticide you need per gallon of water. This will vary depending on the pesticide type and the plants you are treating.
For a broadcast application, you will want to calibrate your sprayer first with water. This will let you know how much total volume of liquid you are dispersing per acre or 1000 square feet, etc.
2. Gather Materials
Make sure to have your PPE. Wear gloves, goggles, long sleeves, and a mask to protect your skin, eyes, and lungs from chemical exposure. You can mix liquids directly in the sprayer tank, but you may prefer to use clean mixing buckets or containers and then pour the solution into your sprayer. Use polyethylene mixing containers that are only used for pesticides to avoid contamination.
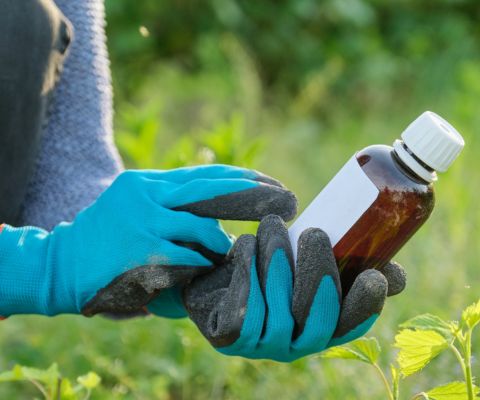
3. Measure the Pesticide
Use a measuring container specifically for pesticides to get the exact amount required. For most hand pump-up sprayers, you will want a small container like this that measures in different units, ounces, ML, Tbsp, etc.
Never estimate. Too much or too little can be ineffective or harmful. Note that some products are concentrated and require dilution, while others might be ready to use.
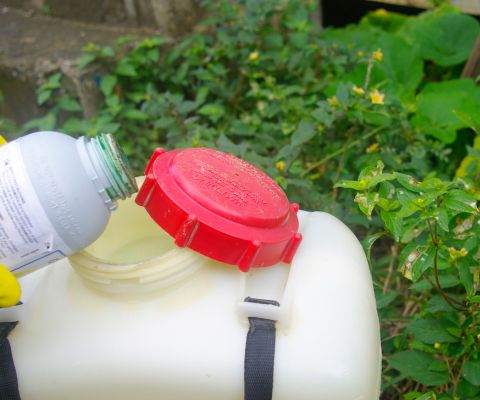
4. Filling the Tank
Fill the sprayer with half the amount of water you will use, add the pesticide, and then add the remaining water. This method helps to ensure that the pesticide is mixed thoroughly with the water. It also helps to avoid foam if you add the pesticide or other liquid product to the tank first.
Make sure you do not overfill the sprayer. It is a good rule of thumb to leave some room in the tank. Also, check the pump assembly and lid for dirt. Clean it off before replacing it to keep debris from getting in your tank.
5. Agitate
Shake or agitate the sprayer gently to make sure the pesticide is well distributed in the water.
6. Perform a Patch Test
I admit that I don’t follow this step every time. Sometimes you only have a small window of appropriate weather (no wind, rain, etc.) and you need to get on with it. However, the best practice is to test your solution before applying it widely. This helps you to limit any adverse reactions to a limited area.
Spray the mixture on a small area of the plant or area to be treated. Wait 24-48 hours, check if there is any damage or if it is ineffective. Adjust as necessary.
7. Apply the Pesticide
Apply during cooler parts of the day or when there is no direct sunlight to reduce evaporation and increase effectiveness. Spray evenly, making sure to cover all necessary areas without over-applying. Avoid windy days to prevent drift.
Spraying methods vary, for a more detailed guide check out this guide on spraying pesticides in and around your home, as well as this article on different methods of spraying.
8. Clean Up
Rinse the sprayer and all equipment with clean water at least three times. Dispose of the rinse water according to local regulations. Store any unused pesticide in its original container, tightly sealed, and out of reach of children and pets. For more details, see this guide to cleaning a pump sprayer that will help extend the life of your sprayer.
9. Record Keeping
Keep a record of what pesticides were used, when, and where, as well as any observations regarding their effectiveness. This information can be valuable for future applications and compliance with local regulations.
Additional Tips When Filling Your Sprayer
Try to use pesticides as a last resort. Consider integrated pest management (IPM) strategies first. If you’re unsure about any step, consult with a local cooperative extension service or a professional for guidance.
Following these steps will help ensure that you use pesticides effectively and safely in your garden, protecting both the environment and your health.
Conclusion
Properly filling your pump sprayer is key to effective and safe pesticide application. This guide should now have you covered in everything from safety measures to the correct dilution ratios to ensure optimal results and minimize risks. Follow these steps closely to master the filling process and achieve the best outcomes in your gardening or farming efforts.
