Nothing is more frustrating than when you fire up the engine on your pump, wait, and no liquid starts moving. It may seem like a mystery why a pump that has been working fine just quits out of nowhere. There are many factors that can cause this and today we will explain how to troubleshoot the pump to find the source of the problem.
A self-priming centrifugal pump is one of the most common tools used for transferring liquid. In agriculture, they are commonly used for filling nurse tanks and sprayers. Whether you have a poly Banjo pump, a cast iron fertilizer pump, a wet seal, a dry seal, an engine drive, or a hydraulic, the pumps all operate on the same principles.
Centrifugal Transfer Pump Parts
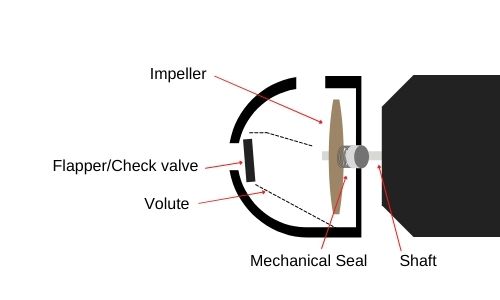
In order to troubleshoot your pump, it is key to know the different parts of the pump. I think it is easier to show than tell, so the image below shows the basic parts of all centrifugal pumps. There are some small variations between different pump manufacturers, but they will all have these common pieces.


Pump Housing and Volute
The pump housing or casing is the outer cover of the pump. For agriculture and fertilizer pump covers are commonly made out of polypropylene or cast iron. Stainless steel is also used for incredibly corrosive materials.
Cast iron housings are subject to rust, but they are less likely to crack than poly pumps. Poly pumps won’t rust but they are subject to cracking when cold or if liquid freezes inside. Poly is much lighter and easy to carry, and it is compatible with a wide range of fertilizers, chemicals, and even DEF. All pump casings are subject to damage or pitting from cavitation.
The volute is the inner shape of the pump. In some pumps, the volute and case are the same things. The design of the volute is important to create pressure from the velocity of the liquid produced by the impeller.
Impeller
The impeller is spun by the engine or motor. Impellers are going to be specific to each pump and they vary in design/size. An impeller is typically sized for specific horsepower. Over time they will wear from friction and abrasion. This will affect the performance of the pump.
Mechanical Seal
The seal of a centrifugal pump is key. It is what maintains a watertight seal around the shaft as it turns. Seals in ag and fertilizer pumps are made of materials to withstand most of the chemicals used in agricultural spraying applications. A seal can easily be damaged if the pump is run dry. This is why it is vital to prime the pump with liquid before using it. More on that later.
Inlet Check Valve/Flapper Valve
The flapper is a check valve that lets water into the pump but does not let it flow back out of the inlet. Once you initially prime the pump, the flapper will keep it primed. The next time you go to start the pump, the volute will already be filled with water. You should still check to make sure that the pump is primed each time you go to use it.
What to Check if Your Pump Isn’t Working
If your pump is not working then check the following possible causes.
Check If the Pump Is Primed
First, you should check if the pump is primed. This means that the pump volute should be filled with liquid. When you have a brand new pump, even if it is “self” priming, you need to add water or whatever liquid you are pumping to prime it. There is usually a priming port on the top of the pump housing to add water.
Your self-priming transfer pump may include a flapper valve on the inlet. If it is not seated properly this could cause liquid to drain out of the pump and lose prime. Residue build-up can cause this, or debris/trash can block it from closing. It could also be the case that it is damaged and needs replaced.
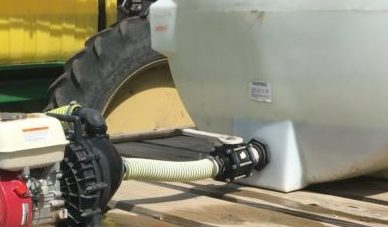
If you have a flooded suction port, meaning the liquid level is higher than the pump inlet. The pump will prime when liquid is supplied. This is often the case when your pump is supplied by a tank, like on a nurse trailer. See below.

Why is Priming The Pump Important?
Filling up the volute with water protects the seal from overheating. If a seal is not “lubricated” by the liquid when it is in operation, it will quickly get too hot and warp, crack, etc. The liquid is needed in the pump case to help the pump push air out and begin to create suction as water (or whatever liquid you are working with) is thrown out to the edges of the volute by the spinning impeller. This creates a low-pressure “eye” in the center of the pump and water will begin to be drawn up through the suction hose.
This is the best video I have found to explain this:
Check for Air Leaks
Check for air leaks on the suction side of the pump. Worn out gaskets in cam-lever couplings, cracks in hose, missing strainer bowls, etc. Anything that brings air into the pump can cause the pump to stall.
As the video above shows, air needs to be out of the pump for it to create suction. If your suction line is allowing air in it, then it will hurt its ability to overcome the suction lift. Air leaks can be a hard thing to find, any connection point or crack can be the culprit.
Is the suction lift or discharge head too much for the pump to overcome?
Suction “lift” is the difference in elevation between the inlet of the pump and the level of the liquid you are trying to pump. Generally, 25 feet is the max you can “lift” water with a self-priming pump. Trying to lift water that is more than 25 feet below your pump will not work. Also, the amount of discharge head in your scenario will decrease the amount of “lift” your pump will be capable of.
The discharge head is determined by many factors. The size (inside diameter), length, change in elevation, filters, elbows, etc., will all add to the head your pump will need to overcome. For example: trying to use a two-inch gas-engine driven pump to move fertilizer 1000 feet through a two-inch hose, is probably not going to work well. The friction over the 1000 feet of hose may be enough that the pump won’t even prime.
You can contact the pump manufacturer or refer to the manual for the pump curve. The curve will show the pump’s flow rate at different discharge head pressures.
If your pump’s plumbing scenario has not changed but is no longer working, then something has happened to the pump or plumbing. Either there is an obstruction, an air leak, or possible damage to the impeller.
Check The Suction Hose
The hose on the inlet side of your pump is extremely important. Any issue with it may keep your pump from properly priming. Cracks or kinks can easily stall your pump.
Is the suction hose collapsed?
A hose rated for suction must be used. This is a hose that is reinforced by a steel or poly coil. If you have a rubber hose that cannot stand up to vacuum, it will collapse and starve the pump.
Is the suction hose too small?
The pump should be supplied with a hose with the same inside diameter as the pump inlet or larger. If you have a foot valve or a strainer on your inlet hose, that strainer may be clogged. Check the strainer bowl and remove any debris that is causing the clog.
There could also be turbulence or vortex where the suction hose is drawing water. This could lead to the pump drawing in too much air. Be sure to have your suction hose draw from an area free of disturbance. If you draw from a tank with an agitation line, don’t put your suction port next to the agitation port.
Impeller Issues
Is the impeller worn/damaged?
Check your manual or with the manufacturer on the original impeller size. It may be worn to such a degree that it has lost its ability to overcome the discharge head in your scenario. An impeller can be severely damaged by cavitation or large debris going through the pump. Worn motor or pedestal bearings can cause the impeller run to spin unevenly and get damaged.
Impeller clogged?
Sticks, rocks, and other debris can potentially get lodged in the pump volute and keep the impeller from spinning. Take the pump housing off and clean out the pump.
Engine or Motor Issues
If your engine is running poorly, it may not be able to spin the impeller fast enough to create the suction needed. Most pumps used in the ag industry are designed to run at about 3600 rpm max. If you are trying to suck water up vertically you will want a smooth running engine that can provide the needed pump rpm.
Liquid Is Too Thick or Viscous
Centrifugal pumps are not intended to pump thick liquids like liquid feed, heavy fertilizers, oils, mud, etc. With enough horsepower, they can pump fertilizers, Usually for a two-inch pump you want more than 5 hp to move 10-34-0 or 32% fertilizer.
Cold temps can also make it harder to pump liquids. A fertilizer that was easily pumped when it was warm out, may not move well at all when the temperature outside is below freezing.
Check with the pump manufacturer on whether your pump has enough horsepower and proper impeller size to move the liquid you are handling.
Obstruction In The Discharge Line
I have to include this one. It is rare, but it does happen. Sometimes you forget to open a valve or sometimes something winds up in your discharge hose and you have no idea how it happened.
I have talked to many people over the years who have checked everything and become frustrated, only to find out a dead animal or some other absurdity plugged their hose. It may not make any sense but for the sake of covering all bases, and keeping you sane, check the discharge line.
Damaged Seal
Mechanical seal failure will cause the pump to leak around the shaft. Friction over time can cause a slow leak, and cavitation will cause a major seal failure. If your pump is leaking this may lead to failure to prime.
There are two types of seal failure. First, over time a seal can wear out from friction and abrasion. It may start to leak gradually and increase over time.
The second type is a total failure from cavitation. This happens very quickly when the pump is run dry or sucks air in during operation. The seal gets hot and cracks warps, or melts. If this happens, you will see a major leak. Either way, the seal needs to be replaced. If the seal goes out from cavitation the inside of the pump should be examined for other potential damage.
Is Your Centrifugal Pump Worth Repairing?
If you have discovered damaged components or your pump still is not working, it may be time to repair or replace the pump.
Repair
The common black poly pumps used for water and fertilizer transfer, are simple and pretty easy to repair. There are only a few pieces that usually need to be replaced. The mechanical shaft seal is the most common item that wears out or fails due to cavitation and running dry. The seal cost is typically only about $40-80 depending on the pump.
The other item that may need replacing is the impeller. The impeller is subject to wear and tear, especially if you are moving fertilizer. Extensive wear can decrease the effectiveness of the pump. This means that eventually, you won’t be able to overcome the same discharge head that you could have before. Generally, poly replacement impellers cost about $30-40.
Body gaskets and o-rings are cheap and usually, it is a good idea to replace those as well when you are taking the pump apart anyway. The body or volute gaskets will come apart sometimes when you remove the cover. They can also be hard to fit back in place if they are old.
Replace
If you have a pump with a broken shaft, cracked housing, and a bad seal or impeller, it may be time to replace the pump. The cost and time of replacing all of these items can add up.
Final Thought
Centrifugal pumps work great when certain conditions are met. If you have a pump failing to move water, finding the cause can be a challenge but if you follow this guide you should be able to get your pump going again in no time.

