No matter what type of chemical pesticide you spray, chances are you will eventually need to repair or replace equipment. One of the best features of the Teejet 30L spray gun is the ability to repair and rebuild it.
The repair kit needed to completely eliminate your leak or problem with your spray gun it’s inexpensive it is fairly easy to install. I recently rebuilt my own spray gun and I decided to document the repair.
How a Gunjet 30L Spray Gun Works
The Gunjet 30L spray gun is a “drip-free” sprayer gun. This means that no liquid should drip out of the gun when you release the trigger.
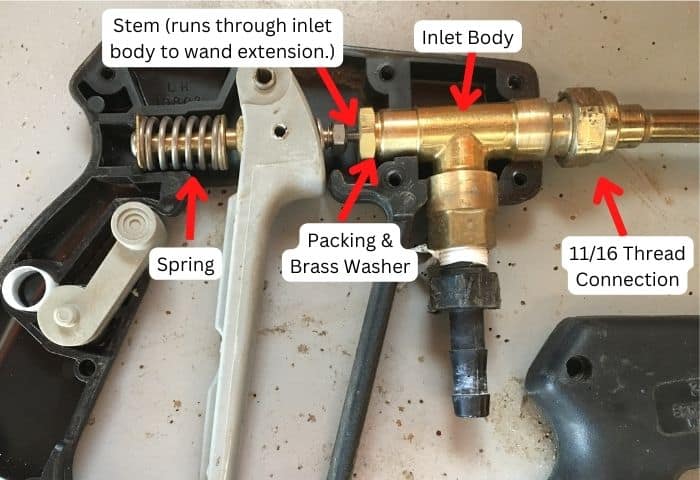
This dripless feature is achieved by a rod that runs from the trigger inside the barrel all the way to the end of the spray wand. The end of the stem is shaped to sit just behind the spray tip and seal off any liquid.
A spring behind the trigger is connected to the stem. When you release the trigger the spring holds the stem in place, keeping any liquid from dripping out.

What You Need to Rebuild a Teejet 30L Spray Gun
Teejet offers a rebuild kit for the 30L spray gun. The manufacturer part number is AB30L-Kit. You can get other parts but the most common repair parts come in the kit. With this kit, you can repair leaking from the inlet body, a broken spring, and a valve that will not shut off.
What is Included in The Gunjet 30L Repair Kit?
The Teejet repair kit for the Gunjet 30L is part number AB30L-Kit and it includes these items:
- Valve seat
- Stem Assembly
- Packing
- Gasket
- Spring
You can find it on Amazon here but it is often available in farm or hardware stores.
Tools Needed
- WD-40
- Phillips & flathead screwdriver
- 13/16 inch wrench
- 5/8 inch wrench
- Needle nose pliers
Disassembling & Repairing Your Spray Gun
To access the internals of the spray gun, you need to remove the seven stainless steel screws that hold together the cover. When the cover is off you can easily remove the trigger assembly, inlet body, along with wand extension.
If your spray gun is leaking around the inlet, you must install new packing in the inlet body. Remove the wand extension to expose the stem inside the wand. Then you can remove the end piece of the stem and remove the entire stem from the inlet body. The rear hexed piece on the inlet body can be removed with a 5/8 inch wrench to get to the brass ring and packing inside.

To repair a trigger that won’t close when you release it, you need to replace the spring. Simply remove the flat head screw from the rear of the spring assembly to access and remove the old spring. Then replace it and reassemble it.

The valve seat comes in the repair kit. This is the main reason I got the kit was that I was missing the valve seat. This is very easy to replace. It fits at the end of the spray wand under the cap or whatever sprayer nozzle that you are using.

Tips to Avoid Breaking Your Spray Gun
The threaded portions of the spray gun/wand and the inlet body commonly get seized up. Use WD-40 or Liquid Wrench to help loosen these connections.
When removing the end of the stem, be sure to firmly grip the stem close to the stem end piece that you are removing. This will keep the stem from bending or breaking as you turn the end piece.
Be careful to not over-tighten any connection during reassembly as this can crack pieces. The packing and nozzle thread is designed to seal up without being cranked overly tight. You can add an anti-seize compound to any threaded components that you may need to remove again in the future.
Conclusion
Repairing the 30L Gunjet spray gun is fairly simple. Most people should have no issues getting their spray gun working again. The repair kit contains the most common repair parts, but you can order almost any item you need for the gun, you just have to contact a Teejet distributor. You can see the full parts breakdown here if you are looking for an item not found in the kit.

