Whether you spray turf, trees, or crops, it is common to use pesticides or fertilizers that can settle or separate in your sprayer tank over time. Agitating the tank helps to keep these substances well-mixed and homogeneous as you spray. Ensuring that these chemicals and fertilizers will work effectively as well as reducing clogs and wear on equipment.
But what if you have a sprayer without agitation? No problem, in this article we will discuss how to add a simple agitation setup to your sprayer. This can be adapted to almost any sprayer: skid spray rigs, tree sprayers, 3-point boom sprayers, boomless sprayers, and more.
What is Sprayer Tank Agitation?
Agitating a tank on a sprayer is the process of stirring, mixing, or circulating the contents of the sprayer’s tank. This is done to ensure that the contents are thoroughly mixed and that most solids are dissolved or remain in suspension.

Different Sprayer Agitation Methods
There are several methods for agitating the contents of a sprayer tank. There is mechanical agitation, which uses a paddle or propeller to stir the contents of the tan. Another option is air agitation, which is done by using an air compressor to push air bubbles into the tank. Finally, there is the method we will focus on in this article, hydraulic agitation. This approach uses the pressure and flow from the sprayer’s pump to agitate the contents of the tank.
Hydraulic agitation is an easy method to add to an existing sprayer. To be most effective, it requires more than simply recirculating liquid back to the pump. You need an agitation or “jet” nozzle in the tank.
Jet agitation nozzles create more turbulence in the tank than just pumping liquid into a port on the tank. The nozzle is typically mounted on the bottom or side of the sprayer tank. When you direct flow into the nozzle, it creates turbulence and circulation within the tank, stirring and mixing the contents of the tank.
How to Install Agitation on a Sprayer
There are two key points to keep in mind when adding agitation to your sprayer. First make sure your pump can generate enough flow to supply your boom, spray gun, and agitation. Agitation jets typically need a minimum of about 2 GPM dedicated flow to be effective.
Second, If you have a sprayer with a pressure relief/bypass line already, you should not use that same line for an agitation nozzle. The bypass line is used to divert flow from the pump back into the tank. This can be accomplished by a regulating valve and helps to regulate the pressure of your sprayer. This ensures that the pump does not generate more pressure than is required for the application or could damage the sprayer. An agitation jet can plug. If you use an agitation line in your bypass, and it plugs, you will have trouble.
The best route is to add a dedicated line for agitation. The process is going to vary depending on your specific sprayer, but here is the general procedure for some common sprayer types.
Second, If you have a sprayer with a pressure relief/bypass line already you should not use that same line for an agitation nozzle. The bypass line is used to divert flow from the pump back into the tank. This is accomplished by a regulating valve and helps to regulate the pressure of your sprayer.
This ensures that the pump does not generate more pressure than is required for the application or could damage the sprayer. An agitation jet can plug. If you use an agitation line in your bypass, and it plugs, you will have trouble.
The best route is to add a dedicated line for agitation. The process is going to vary depending on your specific sprayer, so we will cover a few different common options.
Location is also important to consider. Agitation nozzles should be located in a spot where they can be effective. If they are in a corner or on top of the tank they may not provide adequate circulation.
Sprayer Agitation Components
The specific components that you would use may vary depending on your specific situation, but you will need some or all of these items to add agitation in your tank:
- Throttling Valve/Gate Valve
- Agitation Jet (See below for information on selecting one)
- Hose
- Bulkhead fitting
- “T” Fittings
- Misc. Plumbing Fittings
- Hole saw bit
Step 1: Cut a Hole in the Tank
A tank bulkhead fitting is needed to create a connection port in a tank. In the context of a sprayer, the tank bulkhead fitting may be used to provide a connection for the sprayer pump, rinse nozzles, or other components in addition to a port for agitation. Installing the fitting requires you cut a hole in the tank.
The hole size is determined by the size of the bulkhead fitting. Each one will call for a specific diameter hole to work properly. A hole saw bit can be used to easily drill out the proper opening.
You will want to identify an ideal location to install your fitting. Many tanks have fitting “flats” or areas of the tank that are flat and not rounded. A bulkhead fitting will seal up easier on a flat area than on a rounded area. You will want the fitting in a place that will provide room to install the agitation nozzle.
If installed in a side wall, the nozzle should be low to the ground and point to the center of the tank. If it is installed at the bottom of the tank it should be near the center. The agitation nozzle should not be near the suction outlet of the tank. This can cause air bubbles to get into the pump. With larger tanks, you may want more than one agitation nozzle/jet. In this case, install them evenly spaced to agitate as much volume in the tank as possible.
After you drill the hole, rinse out any plastic filings or debris left over from drilling through the tank wall.
Step 2: Install agitation nozzle
Depending on which agitation nozzle you use, you may need to install it in the bulkhead body before installing the bulkhead in the tank. If you can reach the location by hand when reaching inside the lid of the tank then you can wait until after you install the bulkhead fittings. This can be challenging to do on some tanks. That’s why I would recommend using this agitation nozzle from Hypro because it can be installed from the outside of the Tank. It threads directly into any 3/4 inch female threaded bulkhead.
What Agitation Nozzle Should I Use?
There are several different options available. The nozzle and how many you need will depend on the tank size. Here are the different options available and the images show generally installed and what size tanks they should be used in.
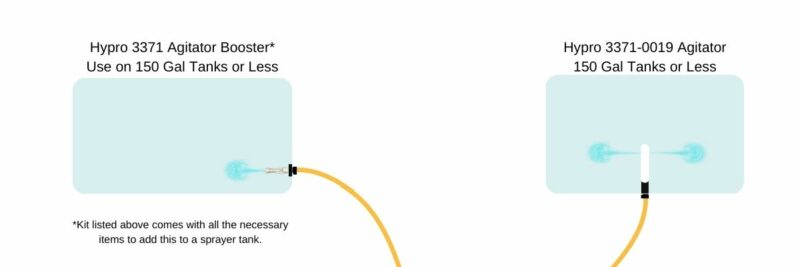
- 150 gallons and smaller: Hypro 3371-0019 Jet Agitator (can be installed easily in existing bulkhead) or use this kit comes complete with everything including bulkhead fitting, hose, nozzles, etc.
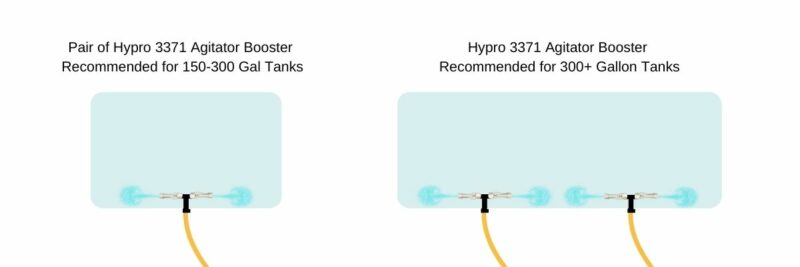
- 150 – 300 gallon: Use two Hypro 3371 Agitator Booster. Use with a “tee” fitting or install two of these kits.
- 300-gallon tanks and larger: Use multiple sets of the 3371 agitators or larger agitation nozzles like the 4Spray eductor nozzles.
Step 3: Install Bulkhead Fitting
A bulkhead fitting typically is made up of 3 pieces: the main body, the gasket, and the nut. The fitting is mounted through a hole in the wall of the tank.
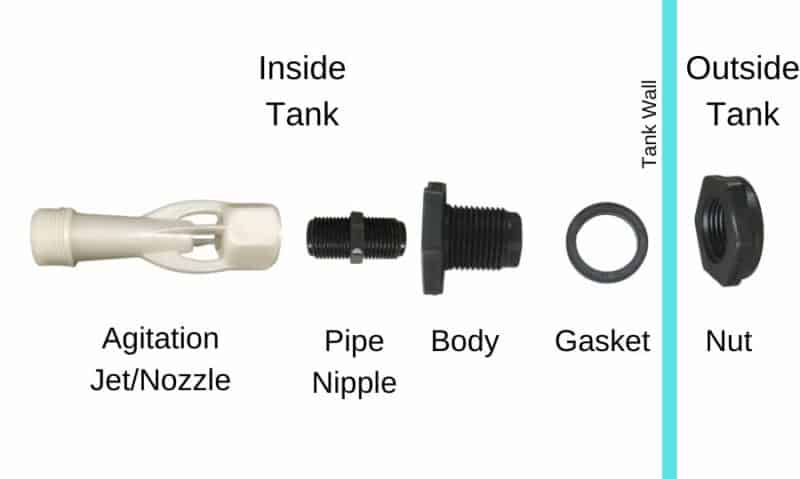
The main body fits on the inside of the tank, the gasket is around the main body, and also on the inside of the tank. The nut is on the outside of the tank and threads on it to pull the main body tight against the gasket and provide a seal. The bulkhead nut is reverse threaded to keep the fitting from coming loose when you install your fittings with pipe thread in the bulkhead.
One of the biggest challenges will be getting the bulkhead body and gasket inside the tank and into your newly cut opening. In small tanks, you may be able to reach inside the lid and place the fitting as needed, but often this will not be the case. A large tank may have a large enough lid that someone can get inside of it, but this is less than ideal for safety reasons.
Instead, use a piece of wire or a thin metal rod. Anything rigid enough and long enough that you can insert it into the tank lid and reach all the way to the tank opening. Then, simply slide the gasket first followed by the body (with the agitation jet installed from step 2) down the wire/pole to the tank opening where you can grab it and pull the threaded portion through the hole. Now thread on the nut to draw it tight to the inside of the tank and you are set.
This video very clearly demonstrates how to install the fitting:
Step 4: Install Plumbing for the Agitation Line
Finally, you will need to connect the agitation nozzle to the hose or line on the discharge side of your pump. For new installations, you will need to cut the hose or pipe and install a “T” fitting. The branch side of the tee is where you will want to place a valve to control the flow to the agitation line.
You can use a gate valve as a “throttling” valve to adjust the amount of flow to the agitation line. Remember, it is preferred to have a dedicated agitation line and not use your bypass/relief line, but you can use a regulating valve/relief valve as a way to control the flow if you need to dial in an exact psi.
From there, simply run a hose to the bulkhead port in the tank and connect it accordingly. Be sure to use a hose rated for the pressure your pump produces and don’t use too small of a hose. If you use poly fittings, they should be hand-tightened and then turned one revolution with a pipe wrench. Use Teflon thread sealer, Teflon tape is okay but thread sealer is better. Using soap on hose barbs will help slide the hose on more easily.
Following these simple steps should provide you with the proper level of agitation in your sprayer tank.