12-volt sprayer pumps are a staple on lawn sprayers. They are also commonly used on ATV and UTV sprayers. I use them quite often to spray pastures and my yard. Like any other pump, eventually, they stop working.
Fortunately, these types of sprayer pumps can easily be repaired. That’s when it’s great to know how to take them apart so you can figure out what’s going on, and what you need to do to fix them.
That’s our goal today, to explain in detail how to take apart a 12-volt sprayer pump. Explain what each part is as well as what it does. This will help you to troubleshoot and fix your sprayer so you can avoid downtime and save some money.
How to Disassemble a 12-Volt Diaphragm Pump
Note: This article will focus primarily on the disassembly of the pump itself and not specifically on repairs or troubleshooting. If you want troubleshooting and repair help, check out the 12 V sprayer pump troubleshooting guide.
The disassembly of a 12-volt sprayer pump is fairly straightforward. I am always a bit paranoid that I will damage something when I start to break down a piece of equipment. So it is always great to see someone else do it first. This way you will know the exact steps to take and things to avoid. Let’s dive in.
Parts of a 12-Volt Sprayer Pump
First, it’s always good to get familiar with the different components of the item you want to disassemble. So let’s look at the parts that make up a 12-volt diaphragm pump.
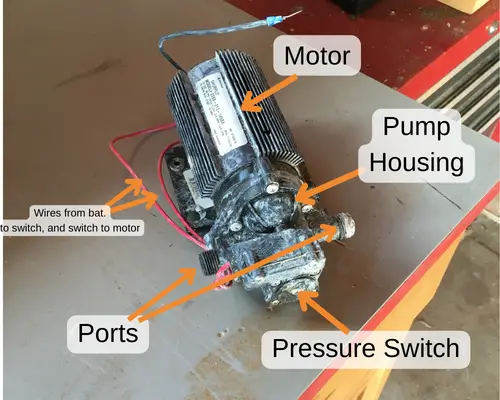
- Pump Housing
- Pressure Switch
- Motor
- Check Valves (internal)
- Diaphragm/Wobble Plate (internal)
Inside the pump housing, there is a diaphragm/wobble plate and the check valve assembly:

For a full breakdown of how these pieces function, you can read this 12-volt pump guide that explains how the pump functions in more detail.
Steps to Disassemble a 12 V Sprayer Pump
Step 1: Disconnect Motor from Power Supply
Before doing anything it is a good safety practice to remove the leads from the battery or the power source. If you are working on your pump, you have likely done this already. Either way, it is a good reminder.
Disconnecting a pump from a battery is easy if you use alligator clips that connect to the battery terminals. Being able to easily remove a pump from the sprayer for storage in the winter is a huge advantage. I recommend storing 12-volt diaphragm pumps inside during the winter to prevent damage. A battery harness like this makes that super easy to connect and disconnect from the power source.
Step 2: Remove Leads from the Pressure Switch
Most 12-volt sprayer pumps are what we call demand pumps. They are equipped with a pressure switch that is connected to the motor. This switch shuts off the motor when a set pressure is reached. This means the switch that shuts off the motor when you release the trigger on your spray wand.
Two wires connect the pressure switch to the motor and the battery. Remove these wires from the pressure switch before taking apart anything else. On many pumps, you can just pull the wires free, but on some switches, you may have to undo the cover on the pressure switch to access the wires and remove them.
If your wires do not easily come free from the switch, you can typically still remove the switch without damaging anything. The wires will just be a bit in the way.
If you would like more details, I suggest reading this article which breaks down the difference between demand pumps and bypass pumps.
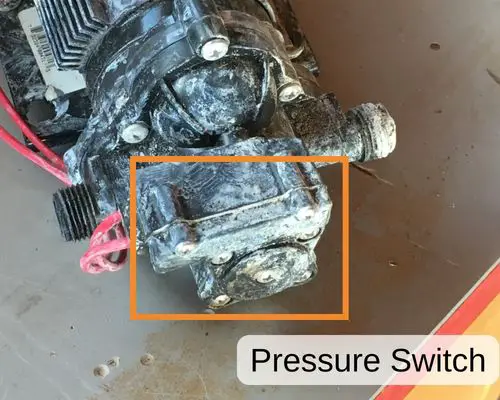
Step 3: Remove Pressure Switch
The pressure switch is a small box with two wires on the front of the pump head. Multiple screws hold it in place. Typically, there are screws that anchor it to the rest of the pump head and one screw near the center of the switch housing. This is for adjusting the pressure setting of the switch.
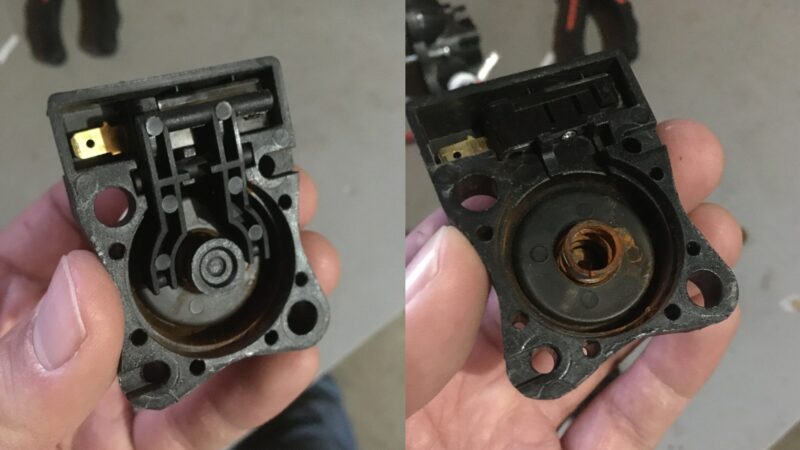
On most pumps, you can remove the pressure switch from the pump by removing the screws then gently pulling it off of the pump housing. If you want to open the pressure switch to access the diaphragm and the micro switch, simply remove the screws and loosen the pressure adjustment screw in the center. Then you can pull the switch housing apart.
Step 4: Remove Pump Housing Cover
The pump housing will have typically six or so screws or bolts holding it in place. Removing all these allows you to remove the cover to access the valve assembly and the diaphragm wobble plate.
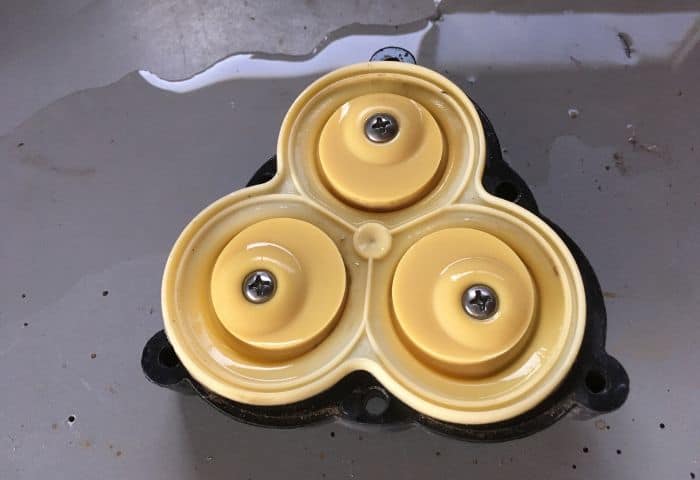
Step 5: Remove Valve Assembly
The valve assembly is the first piece you can remove after taking the cover off the pump. The valve assembly consists of generally three or more valves. It is the opening and closing of these valves that draw liquid into and force it out of the pump.
You can learn more about how these pumps operate in this complete guide to 12-volt sprayer pumps.
Step 6: Remove Diaphragm/Wobble Plate
Once the valve assembly is off, you can remove the diaphragm/wobble plate. This is the component that sits on the shaft of the motor. While the rest of the components are usually easy to remove, the wobble plate may require a flat-head screwdriver to pry off the motor shaft.
Examine, Clean, and Repair
With the pump disassembled you can examine each component for any damage. Also, you can thoroughly clean out the check valves to make sure no debris or chemical residue is keeping them from opening and closing.
You can rinse out the internal components of the pump and thoroughly clean the diaphragms. If necessary, you can also replace the valves for the diaphragms. Kits are typically available for most models of 12-volt diaphragm pumps.
Reassembling a 12 Volt Diaphragm Pump
After you’re finished cleaning everything or replacing the damaged parts, you can reassemble everything. The wobble plate and diaphragm go first, followed by the valve plate, and then the cover.
The diaphragm also serves as a seal between the pump housing and the motor housing. It is important that you don’t install the screws tightly at first. Insert them about ⅔ of the way, then, you can make sure the diaphragm is correctly in place and won’t get pinched.
Gradually tighten each screw a bit, moving in a star pattern like you would when tightening lug nuts on a car tire.
Once you have everything tightened up, you can reconnect your pump to the sprayer and test it. Make sure there are no leaks around the pump housing. If there is a leak, then loosen the screws on the pump housing and ensure that the diaphragm is seating properly. The lip on the edge of the diaphragm serves as the housing seal for the pump.
There you have it. Taking apart a 12-volt sprayer pump is simple and it is good to know how to do it right so you can clean and do any necessary maintenance to keep your pump running. For more details on troubleshooting and repairing 12-volt sprayer pumps, check out this diaphragm pump guide.
