The most common pump found on lawn, turf, ATV, and spot sprayers is the 12-volt diaphragm pump. Their versatility and affordability make them a great choice for many different types of sprayers. However, all at once, they can stop working for seemingly no reason. That’s probably why you are reading this, so let’s not waste any more time and get right to what may be causing your pump to fail and how to fix it.
12-Volt Sprayer Components
If you are new to 12-volt diaphragm pumps, you might want to check out the complete guide where we cover everything from their parts, capabilities, installation, operation, and more.
In order to quickly fix issues with your 12-volt pump, it is important to know how these pumps get set up on lawnmowers, ATVs, boom sprayers, etc. The way that the pump is installed and how the plumbing is set up can affect the pump.
Regardless of the brand, these 12-volt pumps all operate very similarly. The motor spins a diaphragm plate. As it spins the plate “wobbles”, this opens and closes a set of valves. This creates suction and pushes fluid through the pump rapidly.
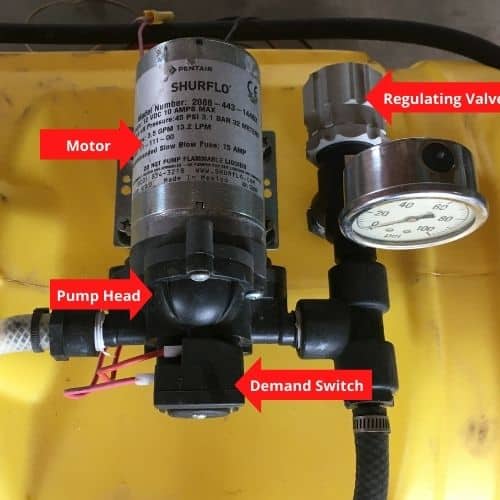
These pumps can be used with a single spray gun or to feed a boom with several nozzles. Typically on a sprayer, the pump will come with a pressure switch (also called a demand switch).
Demand Vs Bypass Pump
The switch shuts off the motor when a set pressure is reached. This happens when you let go of your sprayer gun trigger or shut a valve on the discharge side of the pump. Although some sprayers have remote switches to control the pump or electric valves, a built-in pressure switch is a simple way for the pump to shut off when you don’t need it to run.
The other pump type is a “bypass” pump. This type of pump lacks the pressure switch, so when there is power to the pump it will run. This pump requires an electronic toggle switch to control it.
12-Volt Sprayer Plumbing
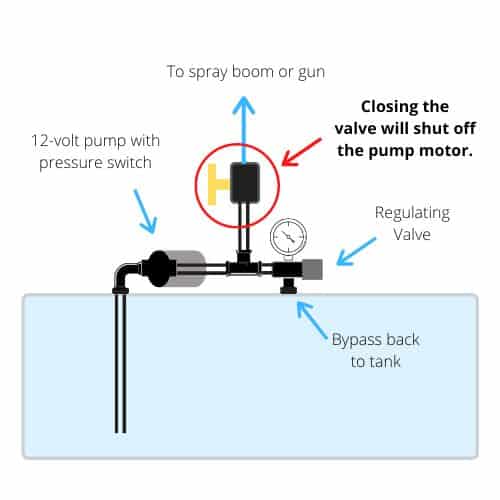
The basic plumbing for most small sprayers that use a 12-volt diaphragm pump is pretty simple. The pumps are self-priming so they are typically mounted on top of a tank with a suction hose running into the tank. On the discharge side of the pump, it can be a little more complex.
If your pump is a bypass pump or a low-flow pump, there may just be a hose that runs from the pump’s outlet to your spray gun. If your pump is a demand-style pump, that means it has a pressure switch, there will be a regulating valve used to control the pressure and keep the pump from cycling. This valve will have a bypass port that is plumbed back into the tank.
If you would like to read more about the crucial elements of plumbing and building a lawn and turf sprayer, I wrote a complete guide on building a sprayer that walks through all these aspects.
12-Sprayer Pump Troubleshooting Guide
This troubleshooting guide applies to Shurflo, Everflow, Flojet, High-Flo, and many other 12-volt pumps found on sprayers made by Fimco, Northstar, Master, Chapin, and many others. You can use the list below to jump directly to the issue you are experiencing with your sprayer.
- Motor runs but pump won’t prime
- Low pressure/Low Flow
- Motor won’t run
- Pump leaking
- Pump cycles on/off
- Pump runs noisy or rough
Scenario #1: Motor Runs But Pump Won’t Prime
Air leak in suction plumbing
To fix an air leak you must identify where it is happening. The one sure way to ensure you have eliminated any air leak is to examine each fitting, strainer, hose, etc. Reapply thread sealant, check hose clamps, and bend hoses to see if there are cracks. Fortunately, there is not much plumbing to check on most 12-volt sprayers.
Sometimes you may not find any evidence of cracks on your suction hose. But the only way to be certain is to replace it. This is usually only a short piece of hose, say 2 or 3 feet at the most, so it is not too costly to replace and can save you a lot of frustration.
Air Lock
A 12-volt diaphragm pump is a self-priming pump. This means that they will suck liquid that is below the inlet of the pump. Most 12-volt pumps can prime about 10 feet vertically, but if air pockets get into the suction plumbing, the pump may struggle to overcome this and prime. You can force prime the pump to get it back to normal operation. To do this, disconnect the inlet hose from the pump. Either gravity feed the pump inlet or use a garden hose to force water into the pump. This should get your air out of the line and allow the pump to prime again on its own.
Plugged Suction Hose or Strainer
If a strainer is present, this should be the first thing to check. Even if water still flows through it, there may be enough dirt, debris, and trash to restrict the flow enough that the pump won’t prime. Flush the strainer and use a brush to clean out dirt stuck in a mesh screen.
Some chemical and fertilizer residue can build up inside a hose over time, stray objects can also find their way into a hose and get lodged. This restriction can prevent the pump from priming, or moving any fluid. Replacing the hose is the solution if the plug cannot be removed. To test for a plug or clog, take the hose of the sprayer. Hold the hose with one end up, and pour water down the hose. Water should run out the other end with no issue.
Low Voltage
It may be that your battery needs charging or you have a poor connection to your power supply. Examine the wires, and charge your battery if needed.
Valve Plate Clogged
The inside of the pump has a series of small valves. If some debris, like a grain of sand, gets stuck inside, the pump will not prime. If you have checked these other potential causes, you can take apart the pump head and check for debris stuck inside. I have had a pump that would not prime. After checking for other issues, I simply took it apart, rinsed out the inside, and then it worked.
Empty Tank or Suction Hose Isn’t Getting Fluid
The liquid level in your tank is constantly decreasing as you spray. At a certain point, your suction hose may not be drawing fluid even if it appears there is still liquid in the tank. If you are on a slight incline the liquid will move to the lowest point, and this may leave your suction hose sucking air.
Some tanks may draw off the bottom, or near the bottom in the sidewall of the tank. This means that when the liquid level gets below the tank outlet you will be sucking air even though there is liquid still in the tank.
The solution is to fill the tank up again, but you may also choose to use a total drain tank with a sump in the bottom.
Scenario #2: Low pressure/Low Flow
Air In Suction Line
Air can be drawn in with liquid either by an air leak or a low liquid level in the tank. This can impact the pump’s performance. If you have a clear suction hose, you may be able to see air bubbles in the line. Check for air leaks or fill the tank to eliminate the air bubbles and improve your pump’s performance.
It may seem like there is plenty of liquid in the tank and no air should be getting drawn into the pump. But, a pump pulling water through the suction tube can create a vortex at the suction hose inlet. This means that air can be sucked in even if the liquid level appears to be above the suction hose inlet.
Diaphragms Are Worn Out
The diaphragm inside the pump is a wearable part. It will eventually wear out, especially when it is pumping things other than water. You can inspect the diaphragm to see if it should be replaced. In addition to cracks in the diaphragm, it might be curled on the edges or even really sticky/oily. Any of these conditions can affect the performance of the pump. You can order diaphragm repair kits for most 12-volt pumps to get you back up and running.
You can see the diaphragm repair kit for a Shur-flo 2088 repair kit here.
Valves Are Worn Out
The valve plate assembly inside the pump can wear out or be damaged. You can also order a valve kit for most 12-volt diaphragm pumps.
See an example here: Shur-flo 2088 valve kit. Be sure to find the kit that works for your make and model of pump.
Restriction in The Plumbing
Low flow can be a result of a plug or restriction in your plumbing. The first places to check are the strainers, screens, and spray tips. There are a couple of common causes of restrictions: chemical or fertilizer build-up or foreign objects getting into the sprayer. I have even seen plastic shavings from the tank wall that got stuck in the pump head because they were not cleaned out after a bung or fitting was installed that required cutting into the tank.
Scenario #3: Motor won’t run
Faulty Pressure Switch
Test pressure switch (demand switch) if applicable: To test the pressure switch, you need to access the wires in the switch. Take the cover off, disconnect the wires, and then connect them together. This will bypass the switch. Then apply power to the motor. If it runs, your switch is bad. If it does not run the issue is in the motor or the pump is locked up.
Discharge Hose is Kinked or Plugged, Tripping Pressure Switch
In this case, the pressure switch is working properly. There is pressure in the line that is causing the switch to shut the pump off. The pump will remain off until the pressure in the discharge line drops. This can be caused by a closed valve, kinked hose, plugged spray gun, etc.
You can disconnect the hose from the discharge port on the pump to eliminate any possibility that something is blocking the discharge. If the pump still does not run, the pump may be bad or the switch is bad.
Blown Fuse
If your power harness has a fuse, check if it is blown and replace it if necessary.
Other Electrical Issue
Examine the wire harness for any damage. Adjust alligator clips or battery terminal connections. Check the voltage of the battery.
Scenario #4: Pump Leaking
Worn Out or Damaged Diaphragm.
The diaphragm assembly in most 12-volt sprayer pumps serves as the seal for the pump housing. If this is damaged or severely worn it can lead to a leak from the pump between the motor and the pump housing.
Bad Pump Seal/O-ring
Not all pumps have a separate o-ring that seals up the housing, but some do. These can become weak, swollen, or lose their shape over time, specifically when used with chemicals and fertilizer. Sometimes you can rinse the o-ring, and lubricate it with Vaseline and it will seal properly again. But, these are typically inexpensive, and if you can find a replacement that is the ideal option.
Cracked Housing
Fixing a crack in a poly pump housing can be difficult. A new pump housing is the best option. To avoid cracks, make sure the pump is completely drained of liquid during cold months.
Scenario #5: Pump Cycles On/Off
The Pump is Oversized for Your Current Sprayer Setup
If your pump is turning off and on rapidly when in operation, then your demand/pressure switch is being activated. This is a common occurrence when someone is using a pump that is too large. Suppose you have a 2.2 gallon per minute pump to supply a spray gun that has a nozzle with a 0.3 GPM capacity. Your pump (if equipped with a pressure-demand switch) will reach its maximum pressure and the switch will shut the pump off. When the pressure drops it will turn the motor back on.
This can be fixed by using a regulating valve. You can dial in the right operating pressure and your pump will not cycle. The regulating valve will divert excess flow back to the tank. For more explanation, I wrote another article about adding a regulating valve or sizing your pump in this post.
Scenario #6: Pump Runs Noisy or Rough
Vibration From Loose Mounting or Missing Rubber Mounts
Tighten your mounting screws or bolts. Check that the threaded inserts are not loose or missing. Rubber pump feet/mounts might be missing causing the pump to sit unevenly.
Loose Screws on the Pump Head
Check and tighten the screws on the pump housing. Screw holes can be stripped out or the pump housing may be damaged. A new pump may be necessary.
Final Thoughts
The key to troubleshooting your 12-volt sprayer pump is persistence. It is easy to become frustrated, but if you follow through with checking all the possible causes of your issue, you can get it working. Another piece of advice is to never assume that the little things aren’t the cause. Check for plugs, check for air leaks, check the battery connections, etc. Most often the problem is a small thing that we wouldn’t consider. Finally, when your pump is working fine then suddenly it stops, consider what has changed. There is usually a connection to why the pump stopped working.
If you are new to spraying or are looking for more information about selecting a sprayer, check out these other posts:
