For managing my property, I have found that a quality lawn sprayer is a must. If you have a piece of land to maintain, you probably need your own sprayer. It will save you money and you can be sure it is done in a timely manner.
But, before you run to buy a sprayer, you may want to consider a DIY sprayer. The sprayers available at farm supply and home improvement stores are affordable, however, they tend to have issues with leaks, durability, and reliability.
Building a DIY Sprayer: Step By Step Guide
Benefits of Building Your Own Lawn/Turf Sprayer
Here are some of the main reasons building a sprayer yourself can be a better option than buying:
- You can choose quality individual components that will last a long time.
- You can make sure the components you use are compatible with the products that you will be spraying.
- You can make sure that all the plumbing connections are secure and sealed up properly.
- You can customize the sprayer to suit your needs.
Choosing Quality Components for Your DIY Sprayer
While there are many ways to put together a sprayer. The basic components are the same. The main items you will need are a pump, tank, hose, spray gun, regulating valve, and plumbing fittings.
Selecting A Sprayer Tank
The tank is the largest piece of the puzzle. While it may seem straightforward, there are more things to consider when choosing a tank than the number of gallons it will hold.
You need a tank that will hold up to the chemicals you are spraying and has UV light protection built-in. This inhibits algae growth in the tank and helps the tank to last longer without breaking down. You also want a tank that is strong enough to prevent cracks and damage should you bump into something.
Tank Material
Polyethylene tanks are the most common plastic tank used for sprayers. They provide UV protection and are compatible with a wide range of chemicals including many pesticides, herbicides, and fertilizers.
Tank wall thickness is measured by the density of liquid it will hold. For example, a tank that is rated for liquids that weigh 14 pounds per gallon has a stronger wall than a tank that is rated for liquids weighing 12 pounds per gallon.
Stay away from any tank that isn’t rated for at least 12 pounds per gallon. 12 pounds per gallon will cover almost any type of pesticide, herbicide, or fertilizer. Even if your liquid isn’t this heavy, you will have a stronger tank that won’t crack easily.
Tank Size
Tank size is another thing to consider. It may seem like a good idea to go with a bigger tank because, of course, you can spray longer without refilling the tank. But when water alone weighs 8 pounds per gallon, a full 25-gallon tank can weigh almost 200 pounds. Something to consider, especially if you plan to mount your sprayer tank on a mower, ATV, or small wagon.
Sprayer Tank Features
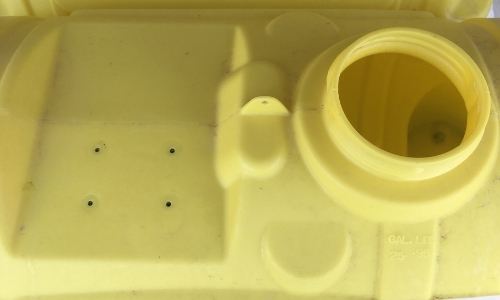
The tanks used in commercial sprayers are 15 or 25-gallon spot sprayer tanks and have a place to mount your pump with threaded inserts. This is preferable to a tank that you will have to drill holes in to mount your pump. Any hole you drill is a potential leak point. Even if it is at the top of the tank, you can get splashing when you are on the move (especially on an ATV/UTV.)
Some tanks even have threaded inserts on the side for mounting hooks to hold your spray wand. They might even have threaded inserts on the bottom to make mounting your tank in place very simple.
Most of the tanks available will have a small drain port on the bottom. This is necessary to drain and rinse the tank. However, most of the spot sprayer tanks available have a flat bottom and many nooks that make it hard to drain out completely. The solution to this is a tank that has a sump.
A sump is a portion of the tank bottom that slopes to the drain. This makes cleaning the tank much easier. Believe me, this can be a huge help when you are changing to a different chemical. Complete cleanout and rinsing of the tank ensure no cross-contamination of chemicals.
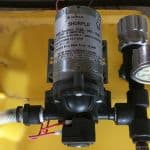
Selecting a Sprayer Pump
The pump is the centerpiece of any sprayer. The majority of turf/spot sprayers utilize a 12-volt electric diaphragm pump. A small 12-volt motor spins a “wobble” plate in the pump housing. As this plate spins the different valves open and close, this works to draw liquid through the pump.
Demand vs Bypass Pump
There are two main types of 12-volt diaphragm pumps: demand and bypass.
A demand pump will operate within a preset PSI range, shutting off when the discharge pressure reaches the maximum set pressure. This allows you to utilize a trigger gun or wand intermittently, as the pump will shut off when you let go of your trigger and start again when you pull it.
A demand pump can be recognized by the small black cube on the pump housing with a screw in the center. This holds the spring that is set to be depressed at a certain pressure, which triggers the motor to stop. This is the type of 12-volt pump that I would recommend, although there are times when the bypass version makes sense.

Choosing The Right Size Pump
The other two main attributes of the pump to consider are flow rate and pressure. Flow rate is measured in gallons per minute (GPM) and pressure is measured in PSI.
If you simply want to use a spray gun to spot spray or use a small boom with a few spray nozzles, then you will need a pump that produces no more than 60 PSI. Generally, 20-40 PSI is adequate. If you want your sprayer gun to reach further distances, you can opt for a pump with higher flow and pressure, but that is a discussion for another time.
To identify the size of the pump you need in terms of GPM, you will have to know what kind of output your application requires. Your sprayer nozzle also called a sprayer tip, determines the output of your sprayer.
For spot spraying the size of the sprayer nozzle is ultimately up to you. A small tip is probably adequate for most situations, however for larger established weeds, you may opt for a higher flow nozzle. That is what I prefer for thistles, that way you can really soak them without having to stand there all day. Always be mindful of drift and safety of course.
For sprayer booms, the recommended application rate of the product you wish to apply and the speed you want to travel will determine the tip you need. You can use this helpful GPM calculator to help determine the nozzle size that is best for you.
Here are some common lawn sprayer scenarios and how much flow is required:
- Spot Spraying: A single nozzle for spot spraying weeds will only require about 0.2-1 GPM. Typically closer to the low side of that, but some nozzles are adjustable and may put out close to 1 GPM.
- Small Booms: The color-coded sprayer boom nozzles also range from 0.2-0.8 GPM. ISO standard measures nozzle flow rate at 40 psi. Yellow color is 0.2 GPM at 40 PSI, red is 0.4 GPM at 40 PSI, etc. See the full chart below. For example, If you have 3 red nozzles on a boom you will need 1.2 GPM.
- Boomless nozzles: The smallest boomless nozzles generally put out about 1 GPM each. If you have larger boomless nozzles you may consider using a different type of pump.
It is a good practice to have a pump that will produce 20% above your needed output to accommodate for pressure loss through the hose, and agitation (more on this later).
Selecting Your Nozzle/Spray Tip
Even though the tank and pump will by far be the most expensive pieces of your sprayer, the most important is the spray nozzle. It is the component that ultimately determines the effectiveness of the unit. Flow rate, spray pattern, droplet size, coverage, and drift, it is all controlled by the nozzle. So even if you purchase a spray wand or trigger gun that comes with a generic or “standard” sprayer tip, you should make sure it will provide exactly what you need.
Different Nozzle Types and When To Use Them
There are hundreds of spray tip options on the market for agriculture and turf use alone. Fortunately, we don’t have to worry about most of them for lawn or turf sprayers. These are the main types that I would recommend and when to use them:
Flat Fan Nozzles: These nozzles are commonly used by farmers on large row crop sprayers. They are intended to be used on a boom and are evenly spaced. Generally 15 or 20 inches apart. They will produce a space angle of 80 or 110 degrees depending on the tip. When in use they overlap providing thorough coverage over the width of the boom.
You can use these on a small boom if the nozzles are spaced 15 or 20 inches apart. They will give you excellent coverage, but they do produce more draftable fines (small particles that can easily be blown away by wind and get where they shouldn’t).
Flood Tips: Flood tips are a little different than the flat fan nozzle. They provide uniform coverage and are more resistant to clogs. They usually have a wider angle of coverage and produce a larger droplet. This will drift less.
These will work great on a small boom. If you are using a systemic herbicide (like Roundup) these are a great choice.
Adjustable Nozzles: This is a broad term that could cover a lot of nozzles, but for our purposes, I am referring to nozzles that you use on the end of your sprayer gun/wand. These can be adjusted from a straight “pencil” stream or a cone nozzle.
Adjustable tips are perfect for spot sprayers, they give you some versatility. There are poly/plastic options, but for the money, the brass tip will usually last longer and have less issue with leaking. Just be sure to rinse out with fresh water after each use.
Boomless Nozzles: A boomless nozzle provides the wide coverage of a boom with multiple nozzles, without the boom. Usually, two nozzles are aligned close together and spray in opposite directions. Each nozzle covers the same area that half of a boom would cover.
They do not provide the even, fine coverage of a boom with flat fan nozzles, but they produce minimal drift. Plus, you don’t have to worry about trees, fences, or other obstacles.
The boomless nozzle is great for pastures and large properties with trees or other obstacles. They also work great for roadside spraying and anti-ice.
I have used Teejet XP Boomless nozzles on my sprayer for years. The left-hand and right-hand nozzles together cover a swath of about 20 feet. If you are interested in building a “boomless” sprayer, then you should check out this article on everything you need to know before building a boomless sprayer.
Sprayer Boom
Your spray boom can be assembled in a lot of different ways. The variety of nozzle and boom components available make it very easy to mount nozzles almost anywhere. A simple spray boom of 2 or 3 nozzles can cover a width of 8-10 feet pretty easily. You can assemble one with the following items.
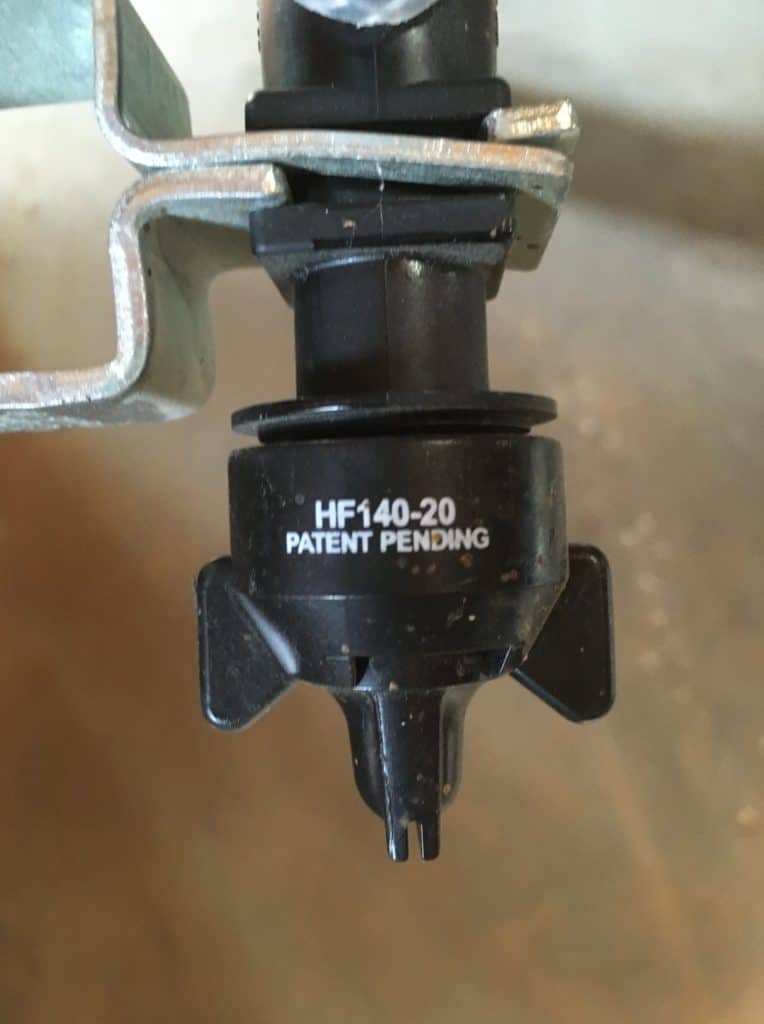
Nozzle Bodies
Nozzle bodies are the component that holds the nozzle and connects it to your boom. Typically they have a hose barb/shank that allows you to connect your supply hose. Although there are “wet” boom style nozzle bodies that are clamped over a pipe that is tapped with small holes that feed the nozzle body with your spray solution.
The nozzle body will consist of the body, the cap (this is where the nozzle goes), and depending on the body there will be a gasket for the cap. Basic nozzle bodies have 11/16 inch thread and a nut that holds the nozzle instead of a “cap”. This type usually does not have a gasket.
Tip alignment and drip from nozzles are two problems that I have found annoying with the common threaded nozzle bodies. I recommend using these quarter-turn nozzle bodies with check valves to eliminate these issues. The quarter-turn style makes aligning flat fan and flood nozzles easier, and the check valves keep your nozzles from dripping after you shut off your sprayer.
Boom Pipe/Spray Bar
For spot treatment of weeds, you only need a spray gun. If you want to treat your entire piece of property you will require a boom.
If you want to cover a width of 8-10 feet then doing it yourself is easy. No welding, no tapping pipe, you just need to find a place to mount each nozzle body and space them evenly. Then you will have a hose feed each nozzle body.
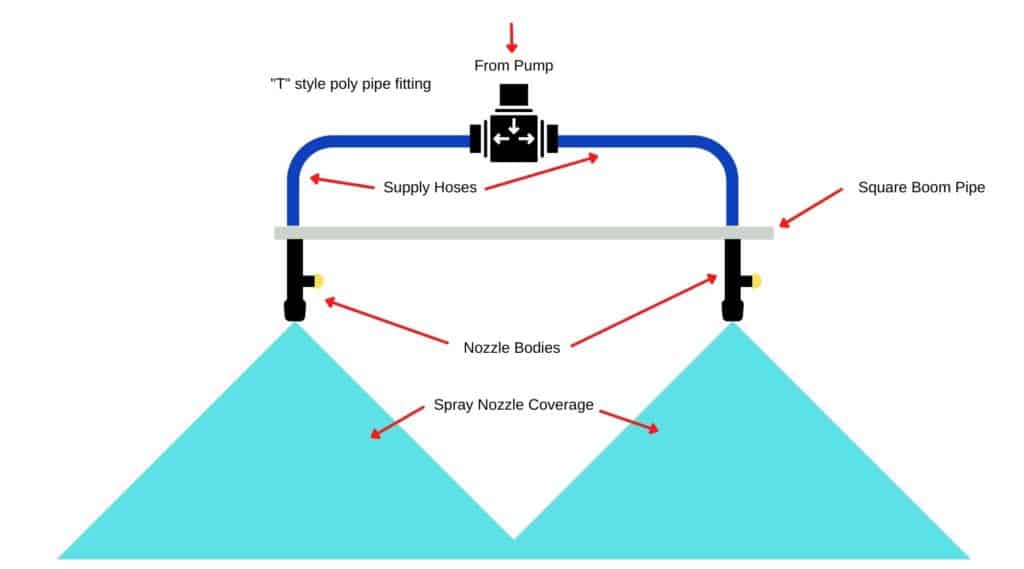
The rack or utility box on ATV or UTV usually provides a good spot to clamp your sprayer nozzle body. The spray height should be between 18-36 inches off the ground. At 30 inches high, a 110-degree flat fan nozzle will cover approximately an 84-inch width. At 18 inches high, it would cover roughly 48 inches. This means a two-nozzle setup can easily cover 7-10 feet and still provide consistent, even application.
Related: Building a DIY Sprayer Boom
Hose
The majority of the commercial spot sprayers on the market are fitted with EPDM rubber and nylon hoses. This type of material is ideal for agrochemicals, fertilizers, herbicides, etc. One thing that does not work well with EPDM is petroleum products. If the product you are spraying is petroleum-based (i.e. mineral spirits), you should consider a Buna rubber hose.
One aspect of the hose I have seen people overlook is the toughness of the outside of the hose. It is likely that your sprayer hose will be drug behind you as you work. Soft rubber or nylon hoses can wear out from friction and abrasion. Paying a little more for a tougher hose will save you in the long run.
Prior to the pump, I recommend using a non-collapsible suction hose. This hose will also be partially submerged in your spray solution so the cover should be made of material with good chemical resistance.
Spray Gun/Wand
If there is one area of your sprayer that you do not want to go cheap, it is the spray gun and wand. This is the piece of sprayer that you will physically be handling the most. The inexpensive plastic and aluminum wands that come on economy spot sprayers will leak, it’s just a matter of time. Eventually, the triggers fail, letting the nozzle continue to drip in between use.
The Spraying Systems Company drip-free GunJet is the answer to these problems. I have used this gun for many years. It is made for commercial use and although it costs nearly $70, it is worth it to me. The wand is durable brass, it will bend before it breaks. The inside of the trigger gun is forged brass and Teflon. The best part is that you can order a repair kit to rebuild it if needed.
Sprayer Plumbing Components
Finally, your sprayer will need plumbing fittings and other control components. These items may vary depending on what kind of sprayer you are building, but these guidelines should help you choose.
Strainer
To protect your pump and ensure that your spray tips don’t plug, you need a small strainer on the suction side of your pump. 40-50 mesh screens are usually adequate to keep most debris that could do damage or plug your nozzles, but 80 mesh screens will be smaller than most tip sizes and ensure you don’t get a plug. (When talking screen mesh size, the larger the number the smaller the perforations in the screen).
Many spot sprayers sold in stores, come with a small mesh screen on the end of the suction hose inside the tank. This makes it a pain to clean out, especially if you get a plugged screen while your tank is full. When you need to clean it you can avoid draining the tank, simply remove the bowl and flush out the screen.
You can still use a suction strainer but I prefer a coarse screen that keeps out large debris and is less likely to plug. Then I rely on the inline strainer to filter out more fine debris.
Regulating Valve
When using a demand pump, you will likely experience “pulsing” when operating the sprayer. This is the pump cycling on and off when you pull the trigger on your spray gun because the pressure in the line is reaching its max and shutting the pump off. This causes the pressure to drop and therefore the pump starts up again. In addition to limiting the effectiveness of your sprayer, it can also quickly wear out the motor relay.
Using a pressure-regulating valve will allow you to maintain constant pressure and smooth operation. The regulating valve will be plumbed into the discharge side of the pump with a “tee” fitting. It maintains your desired pressure by discharging excess flow back into your tank.
The regulator also provides a port for a pressure gauge. This is useful if you are spraying with a boom and have determined that you need to operate at a certain PSI and speed to put out your desired rate.
The bypassed flow from the regulator also provides some agitation to keep your spray solution adequately mixed.
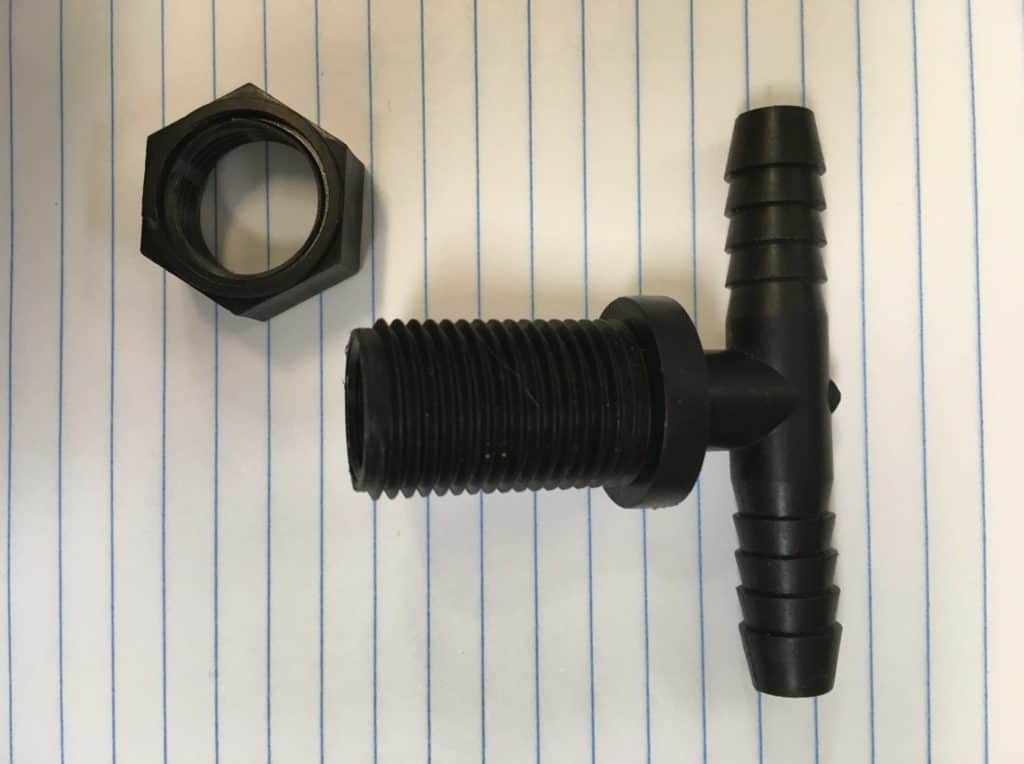
Plumbing Fittings
Polypropylene or nylon fittings will work great with most spray chemicals or fertilizers. They don’t rust and they are made pretty strong, especially Banjo brand fittings. They are rated to 150 PSI. One drawback of poly or nylon is that they can crack if over-tightened or if liquid freezes inside.
Stainless steel can be expensive but does provide a heavy-duty option. Brass fittings can offer a less expensive but still durable option. Whatever material you use, flushing the system and using a tank neutralizer at the end of each season will prolong the life of your components.
Recommended Spot Sprayer Parts List
- Sprayer Tank:
- Sprayer Pump:
- Shurflo 3 Gallon Demand Pump
- Everflo Pumps (Most Affordable)
- Spray Gun:
- Boom Kit:
Assembling Your Sprayer
The first thing I like to do when building a new sprayer is lay out all the pieces on a table or shop floor. This allows you to eliminate any issues with space, or functionality. Try to consider potential problems You can start by asking some questions like this:
- Will you be able easily reach the control knob on the regulating valve when in use?
- Is the pressure gauge facing the right way?
- Will the lid still open?
- In what order do I need to connect the threaded pieces?
The last one is key to saving time and frustration. Don’t install the pump on the tank without first determining what fittings need to be installed on it. Many pumps offer “quick-attach” or union swivels to make installing pieces on a stationary pump much easier. I would recommend using one of these if possible. The pump can be mounted in place and you can switch your plumbing easily whenever you want.
Mount Pump
If you followed my advice way back in the section about choosing a tank, you will have an easy task installing your pump.
The threaded inserts in the top of the tank are spaced to accommodate the standard footprint of a 12-volt diaphragm pump. Roughly 3.2 x 2.25 inch spaced with 10-24 threaded inserts. 4 hex head screws about 1-inch long work well with most pumps.
Drill Holes
Next, you will need to cut a hole in the tank for your suction hose and for your return/bypass line. A hole saw bit is the easiest way to achieve this. To ensure that the tank does not leak around the hole, we will install a tank bung in each hole. A 3/4 inch poly tank bung will take up some space, but it is about as small as they come. It requires a 1-1/2 inch hole to install.
The tank bung, also known as a bulkhead, is made up of three pieces: one piece inside, one gasket, and a nut on the outside of the tank.
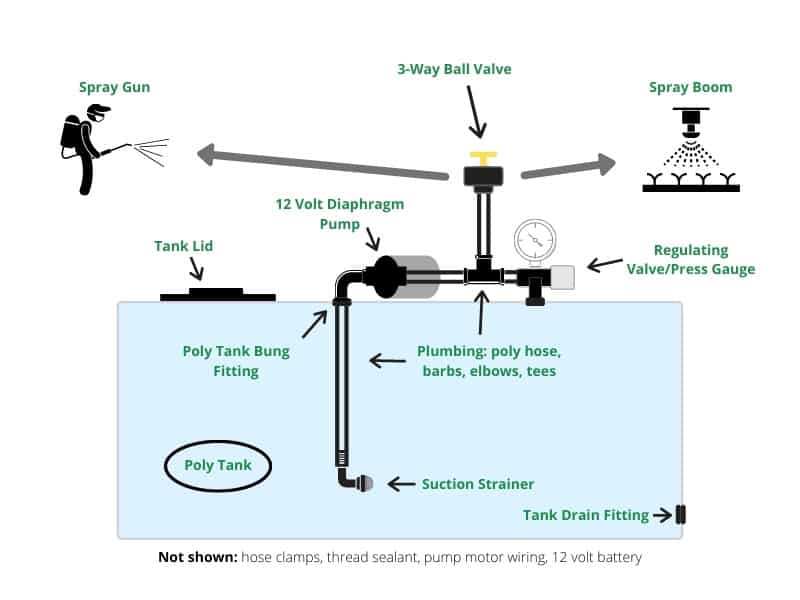
Install Hose, Regulating Valve, and Strainer
The rest of the assembly process is simply connecting your plumbing components. There are many ways to plumb a sprayer that will work but, you can follow this simple diagram to ensure you locate your strainer, regulating valve, etc., in the correct spot.
Sprayer Plumbing Tips
Be sure that you don’t over-tighten your poly or plastic plumbing components. They can crack easily when using a wrench to tighten. Use a thread sealant and then hand-tighten your plumbing fittings. When they are tight, use a wrench and turn one revolution. This will adequately seal your connections on pipe fittings smaller than 1 inch.
Conclusion
If you are looking for a more robust and long-lasting sprayer you should consider constructing it yourself. The process is not complicated and it does not require many tools. The information in this post should allow you to build a durable and quality sprayer that meets your needs.
