A sprayer boom is an effective tool to evenly and accurately apply pesticides over a surface area. If you have an existing spot sprayer or skid sprayer you can make a boom yourself and take your spraying to the next level.
For a minimal investment, you can build a versatile DIY sprayer boom that you can use for an ATV, UTV, mower, truck, or lawn tractor. It is a pretty simple setup that does not take much time and you can do it with just a few tools. However, there are some key aspects you want to get right, so let’s jump right in.
Choosing The Right Boom-Type for Your Sprayer
There are two main boom types: conventional and boomless. In this article, we will be looking at how I built a simple conventional spray boom. A conventional boom is probably what most people think of when they consider a sprayer boom. It is made of a number of flat fan nozzles evenly spaced across a pipe or bar.
The boomless type of sprayer boom is really not a boom at all, hence the name. Instead of multiple nozzles spread across a piece of pipe, there are just two specially designed nozzles to cover the same area as a boom. There are many advantages to this type, but the coverage will be a bit less consistent. If want to see how a boomless setup compares to a conventional boom be sure to read this article comparing the difference between boom and boomless sprayers.
Conventional spray booms can be divided into two categories as well: wet and dry. The difference is how the fluid is carried to your nozzle bodies. For more information, you can read this article where I explain the difference between a wet and dry boom in detail. I decided to build a dry boom for my sprayer because it is simpler to get all the nozzles to line up and you don’t have to drill holes in a pipe.
DIY Sprayer Boom Parts List
The quantities of these items will vary depending on how large a boom you want. You can use these to make a boom with just two nozzles or 15. It can be even larger assuming you can support the boom on your sprayer and find a long enough piece of the steel tube.
- ¾ Steel Tube
- “Tee” check-valve nozzle bodies
- “L” style check-valve nozzle bodies
- ¾ inch square pipe nozzle body clamps
- ⅜ inch EPDM rubber hose
- ⅜ inch hose clamps
- 8-Inch corner brackets
- ¾ inch U-bolts
- 3/8 inch hose barb “tee”
- 3/8 inch ball valve
Steel Tube
I go with square tubing because it is easy to line up the nozzle bodies. Round pipe means your nozzle clamps and nozzle bodies don’t line up precisely.
Boom clamps are available for ¾, 1, and 1-¼ square pipe. I use ¾ inch pipe because the cost and weight will be less.
Nozzle Bodies
You can use the standard threaded nozzle bodies but, I prefer quick-jet nozzle bodies from Teejet. With these nozzle bodies, it is easy to take your nozzles on and off, and it lines up your nozzles automatically. With the standard simple nozzle body and threaded cap, you must hold your nozzle in place and tighten the cap and it can be a pain to try to get every single nozzle lined up.
These nozzle bodies also have a check valve so that when your pump is not running or you shut off your section valves, your nozzles will not continue to spray. The check valve closes when the pressure drops below a certain pressure. This keeps the liquid left in the hoses from dripping out after you shut off your boom valves. On my sprayer, I use nozzle bodies with 3/8 inc hose barbs but, you can get other sizes.
Related: Complete Sprayer Nozzle Body Guide
Boom Clamps
The nozzle bodies are connected to your boom pipe by clamps also made by Teejet. They fit securely around the nozzle body and the square pipe. Again, the best part is that using a square pipe and clamps automatically lines everything up. Using a clamp on a round pipe would make it harder to line up
As mentioned above, you would choose the size based on the steel pipe size you want to use. The portion that clamps around the nozzle body does not change, only the pipe size it will connect to.
Hose
EPDM rubber hose is very resistant to different types of chemicals fertilizers, pesticides, etc. it is a great choice for boom hose. You can also use braided nylon tubing it has chemical resistance but it does not hold up to sunlight as well as EPDM. It will discolor, become brittle and crack.
Mounting Brackets
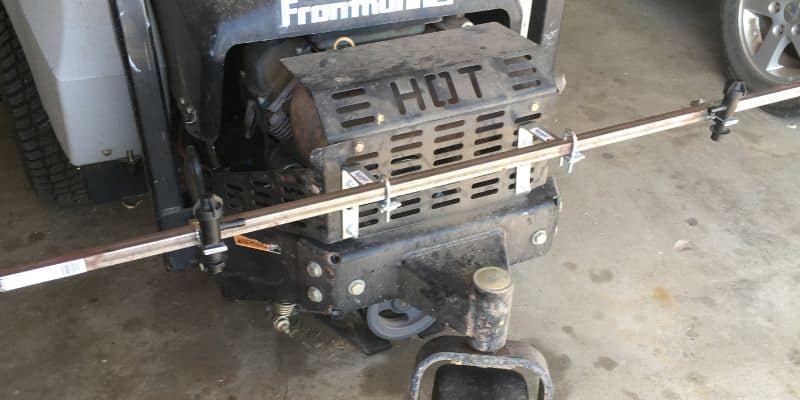
How you mount your spray boom will vary depending on the type of equipment or vehicle you are going to be using to spray. In my scenario, I wanted a small boom to put on the back of the zero-turn lawnmower. This mower just happens to have slots on the guard around the muffler that was the perfect spot to attach some angle brackets.
You may not have the same place to attach brackets and you will have to find something else at work. If you wanna spray with an ATV you can generally find a way to attach some brackets to The rack with the view bolts. For a UTV or pickup truck, you could design a bracket to fit into the receiver tube.
How to Make a Boom
Tools Needed
- Screwdriver
- ¼ inch drill bit for metal
- Drill
- Assorted wrenches
- Pliers
Installing Nozzle Bodies
After deciding how wide of coverage I wanted, I cut the 3/4 inch steel tube to a length marked out where I wanted my nozzle bodies. I will cover more about how I decided on my spacing below.
After marking the spots where I wanted to know somebody so you can install the square boom clamps around a nozzle body and slide them onto the square pipe. This is a very simple and slick process because these nozzle bodies and clamps are specifically designed to fit together and mount on 3/4 inch square tubing.
Video Showing How to Install Nozzle Bodies:
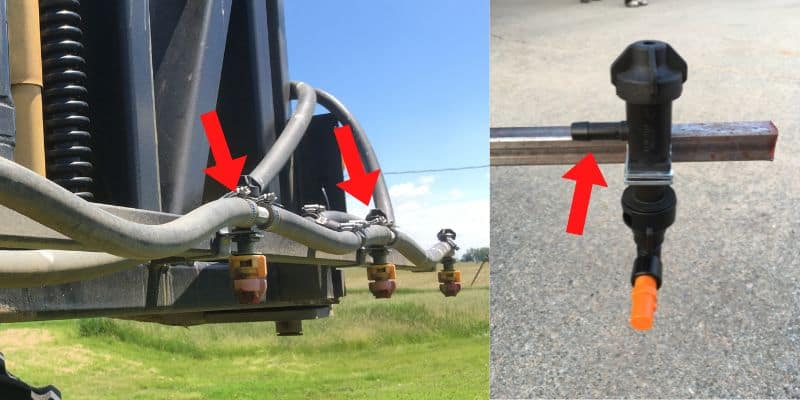
There are two different nozzle body styles used on a “dry” boom. “L” style and “T” style. The “L” style nozzle bodies have one hose barb. This type will be at the ends of your boom or boom section if you have multiple sections. The “T” style has two barbs. One on each side, this type of body will be in the center of your boom or boom section. Depending on the size of your spray boom you may have several of the “T” style bodies, but you will just use two of the “L” style nozzle bodies per boom section.
Install Brackets
Installing the brackets on the mower ATV truck TV or whatever you were spraying with is the part that requires a little more creativity as all vehicles or equipment will be a little different and you’ll have to find someplace to attach the brackets.
You can see in the image below how I was able to mount the brackets on my mower.

Connect Spray Boom to Mounting Brackets
The hardest part of the process is drilling a hole in the brackets for the U bolts. The brackets already had some holes but they were not close enough together for the 3/4-inch U-bolts I used. The size of the bolts is 1/4 x 20 so I used a quarter-inch drill bit.
I primarily use flood jet boneless nozzles on this boom so the spray pattern does spray out far enough tonight at the rear wheel. If I were going to use flat fan nozzles that spray straight down I would probably extend the brackets so that they would clear The rear wheel on the mower.
Run Hose to Your Boom
The last step is to plumb your boom with your sprayer. On the end of either side of the boom, you will have an “L” style nozzle body, in between, you will have your “T” style bodies You simply connect each nozzle body with the appropriate amount of hose. Try to cut the hose as short as possible and still reach each nozzle body. This will keep your hose from hanging down in between the nozzle bodies, creating a spot for fluid to reside when the sprayer is not in use. This can lead to residue build-up inside your boom hoses.
In the center of the boom or each boom section, you will need to install a hose barb tee. This is where we will connect the supply hose from the pump. For my low-volume sprayer, I am using ⅜ inch inside diameter hose and a ⅜ inch hose barb tee.
Finally, I included a 3/8 ball valve in my supply line to the boom. This will allow me to shut off my boom when I don’t need it or want to use my spray wand instead.
How Far Apart Should I Space My Spray Nozzles?
Your spray nozzle spacing will be determined by the spray nozzles that you will use. There are several different spray nozzle patterns available. If you are just getting started and would like more information on the different types of spray nozzles be sure to check out this article on common spray nozzle questions. On a traditional sprayer boom, flat fan nozzles are most common but flooding nozzles and boomless nozzles are also common.
Regardless of the nozzle brand or type, each nozzle will have a spray angle. Common spray angles are 40, 80, 110, and 120 degrees. The wider the angle the farther the nozzles can be spaced and still overlap to provide even coverage.
15 and 20-inch spacing are common for booms using flat fan spray nozzles. Wider angle flooding nozzles can be spaced further apart. Boomless nozzles are generally placed close together and they spray in opposite directions. You can get the full scoop on boomless nozzles in this article about the best boomless nozzles.
I chose to mount my nozzles 40 inches apart because the nozzles that I wanted to use were wide-angle flood nozzles with a 120-degree spray pattern. The manufacturer recommended 40-inch spacing when mounted above 18 inches of the ground.
How High Should I Mount My Spray Boom?
Boom height is also a factor in how wide you should space your nozzles. The higher off the ground you mount your boom, your spray nozzle will cover a wider area.
For example, an 80-degree nozzle at 12 inches off the ground will cover a width of 20 inches. At 36 inches from the ground, it will cover a 60-inch width.
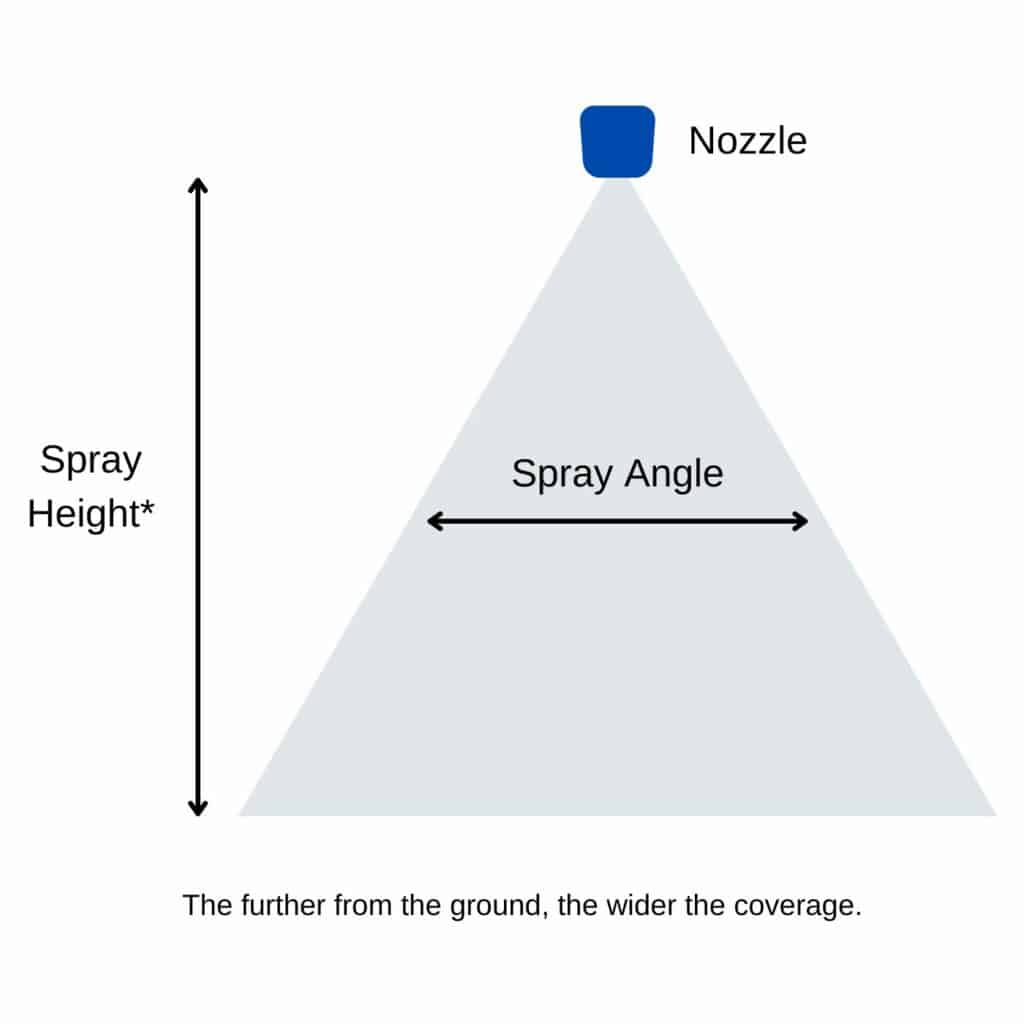
So, in theory, the higher you mount your boom the wider you can space your nozzles and still get even coverage. However, the higher your nozzles from the surface, the less dense and consistent your spray pattern. At a certain height, your droplets will disperse and drift away leaving your sprayer ineffective. Typical mounting heights are 18 inches up to about 36 inches off the ground.
Things to Remember
A spray boom can be made in many different ways. No matter how you go about building one, it is key to remember that the type of spray nozzle you are going to use will dictate many aspects of your boom. Nozzle spacing, boom height, and the size of your plumbing need to be designed around the nozzle.
If your nozzles are spaced too far apart you will not have even coverage. If your boom is too high your spray droplets will drift. If you don’t supply your boom with a large enough hose to adequately supply enough fluid for the size and quantity of your nozzles, you will have inconsistent spray patterns.
The spray nozzle is the most important part of a sprayer so as long as you build your boom around your nozzle type you can build a simple but effective spray boom.
Interested in building your own sprayer? Be sure to check out this guide on building a DIY sprayer that lasts.
