If you are in the commercial lawn or tree care business I don’t have to tell you how frustrating it can be when your skid sprayer is not functioning properly. You can spend a lot of money having a service shop repair it, or you can try to fix it yourself. This is easier said than done if you are not certain what to look for.
Troubleshooting a skid sprayer requires a systematic approach to identify the cause of the problem in a timely manner and determine the best way to fix it. In many cases, the problem is a simple one and you can get back up and running quickly. In this post, we will provide a general troubleshooting guide that can help you diagnose and solve common problems with skid sprayers
Skid Sprayer Overview
Skid sprayer is a general term that covers a wide variety of sprayers. It generally refers to any sprayer that is on a skid that can be forklifted in and out of a truck or trailer. A skid sprayer can vary in tank capacity, pump type, amount of hose, etc. This post will focus on troubleshooting sprayers that use an engine-driven diaphragm pump but can be helpful for other types as well.
There are many diaphragm pump manufacturers. Hypro, Udor, Comet, and AR are some of the most common. Troubleshooting these pumps is generally the same, as they operate on the same principle. If you are not familiar with the different types of sprayers you can refer to this article on the basic sprayer types.
Parts of a Skid Sprayer
If you’re new to using skid sprayers, understanding the different parts of the equipment is vital to proper troubleshooting. Skid sprayers consist of several essential parts that work together to provide you with an effective spray output. Here is an overview of the different components of a skid sprayer, including the tank, pump, engine, hose, and other essential parts.
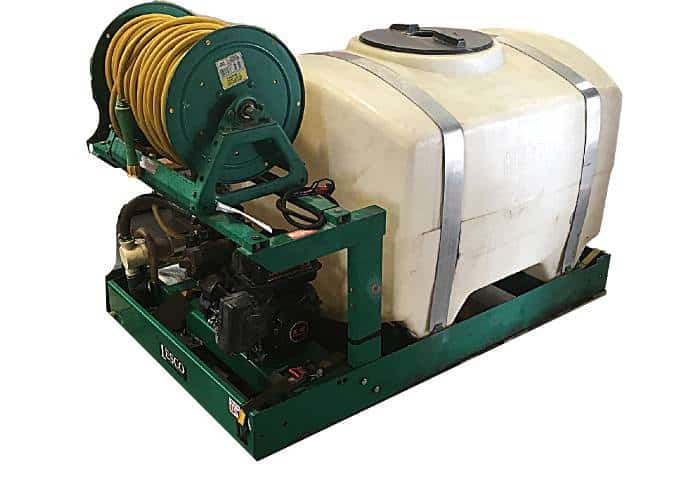
- Tank
- Pump
- Engine
- Controller
- Suction Hose
- Strainer
- Hose Reel
- Discharge Hose
- Spray Gun
If you are new to sprayers and would like more details on the different parts of a sprayer, look at this article for more details about the function of each sprayer component.

Common Skid Sprayer Issues
First, let’s examine some common issues that are easy to identify and fix. Then we can look at specific symptoms and how to determine the root cause. It is important to keep in mind that the pump on your skid sprayer develops flow.
The pressure is determined by other factors, mainly the regulating control valve and the nozzle size on your spray gun. So although the pump is the centerpiece of the unit, when your sprayer is not performing properly, the pump may not be the issue.
Bad Diaphragms
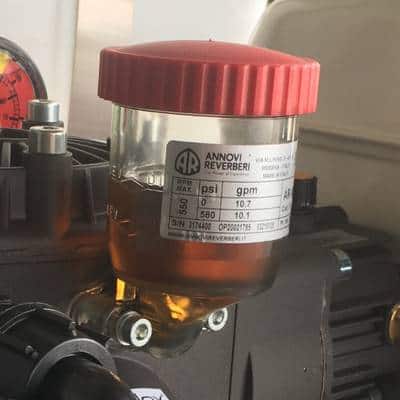
The most common issue that will arise in this type of pump is diaphragm wear. If the oil sight glass shows milky oil, then you have diaphragm failure. When diaphragms begin to wear out and crack, the chemical and water mix you spray will begin to seep past the diaphragm and contaminate the oil in the pump.
It is recommended that diaphragms be changed before it gets to this point. You can take the diaphragms out and inspect them for cracks, splits, and other wear to determine if they should be changed.
Splits may not be noticeable, bend and flex the diaphragm to reveal any potential cracks. The best practice is to change the diaphragms for every 500 hours of use or 3 months.
If you believe that your diaphragms are becoming worn out too fast, then there is potentially a chemical compatibility issue. Chemicals left in the pump can deteriorate the diaphragm. This damage is usually more obvious than the cracks from normal wear.
The diaphragms can start to crumble or break apart from chemical residue. Flushing the pump with fresh water after use is the best way to prolong your diaphragms. Also, confirm the diaphragm material is suitable for the products you are spraying.
Suction Plumbing Problems
The second major issue for skid sprayers is caused by air in the suction line. Diaphragm pumps are self-priming pumps, but if the air is being drawn into the line then the pump will start to perform poorly and even lose its prime completely.
If you are building a new sprayer be sure to use a suction hose on the inlet side of the pump. A plain rubber hose will collapse under the suction created by the pump. Using too small of an inlet hose can also harm the performance of the pump.
Pressure Regulating Valve
High-pressure diaphragm pumps require a regulating valve. They provide the user with the ability to adjust the operating pressure and direction of flow to your different sprayer accessories. A pressure regulating valve can go bad, so if your pump does not seem to be performing the issue may be with the regulating valve.
A damaged or malfunctioning regulating valve is not common. When the issue is the regulating control valve, it is usually an incorrect setting or unintended adjustment to the valve that is the cause.
Granular Products
If you are using a granular product in your spray mix it is crucial to have good agitation. Suspended solids and undissolved powders will eventually build up and plug the internal manifold of a diaphragm pump. Agitation along with flushing the pump after use is important to prevent this from occurring.
Skid Sprayer Trouble Shooting
In this section, we will outline different symptoms that may arise with your skid sprayer, such as low flow, low pressure, and leaks. We will focus on skid sprayers that use a diaphragm pump like a Hypro D30, Udor Kappa 43, etc. We will look at the various steps that can be taken to diagnose and solve each issue.
Symptom: Low or No Pressure
When your sprayer fails to deliver pressure or the pressure drops below normal there are a few possible causes. Here is what to check:
Check regulator settings, tank level, and valves.
Before you jump into the more involved checks, take the time to check some of the human error causes. As unlikely as it may be, it can save you a world of time and frustration to double-check these things: the regulating valve setting, and tank level, and make sure any valve on the suction side is completely open.
Check the oil in the sight gauge.
Damaged or ruptured diaphragms will result in milky-colored oil. Severe damage to the diaphragm can mean a loss in pressure and damage to your pump. To fix, replace diaphragms and clean the pump crankcase. Fill with new oil.
RELATED: Diaphragm Pump Oil Guide
Check the suction strainer for clogs.
The suction strainer will be somewhere in the suction line between the tank and the inlet of the pump. Remove the bowl to see if the strainer screen is partially or mostly plugged. If so clean it out or replace it.
Check for plugs or restrictions in the suction hose.
The suction hose runs from the tank outlet to the inlet of the pump. Depending on your sprayer, the suction hose may start at a sump in the bottom of the tank or it might be on the top of the tank with a suction tube inside the tank. Inspect the hose, suction tube (if present), and any fittings in the suction line for any obstruction.
Check for air leaks in the suction plumbing.
If you have a clean strainer and find no issue with your suction hose, then there is likely an air leak present. It can be very hard to identify where exactly air is getting into the suction plumbing. Often there will not be an obvious visual sign such as a crack in your hose.
If you have a clear suction hose you may be able to see air bubbles present in your line. You can follow the air bubbles to see where they begin. This will help you identify the air leak. If you do not have a clear hose, then you can start at the inlet of the pump and work backward. Check all the connections, fittings, o-rings, strainer bowls, etc.
Check the valves.
If none of these other items are the cause. It may be that the check valves on the pump are not working properly, or are not seated. Make sure the springs are working and no debris is in them. Replace any damaged valve.
Symptom: Pressure Fluctuates/Pump & Hoses Pulse
Check the strainer and suction hose.
In addition to low/no flow, pulsation, and pressure fluctuation can be caused by air getting in somewhere in the suction line. Examine the suction plumbing and clean the filter. This would point to an air leak somewhere in the suction hose or plumbing.
Inspect check valves.
A damaged check valve or a check valve that is not closing up properly can result in a noisy and pulsating pump. The valves should seat completely and evenly. Rinsing them off and cleaning them can help if there is residue built up in the pump. Replace if needed.
Symptom: Pump Does Not Prime
Check suction plumbing for air leaks.
Check the usual culprit again: an air leak in the suction line. If your pump is not drawing any water, then the pump is likely pulling air in somewhere in the suction plumbing. Check all fittings, connection points, o-rings, hoses, strainers, etc. You can force prime the pump by running water directly into the inlet or gravity-feed it. If the pump functions normally when gravity-fed, then there is likely an air leak. Replace the old hose if needed.
Inspect Filter
A plugged filter will not only lead to low pressure but can potentially cause a failure to prime. Clean out the filter to eliminate any restrictions.
Inspect Check Valves
Again, the check valves installed incorrectly can cause pump issues. If you have recently replaced or worked on the pump, the valves may have been installed upside down.
Symptom: Pump Losing Oil
Check the oil sight gauge.
If the oil is milky in color it means that your diaphragms are letting your spray mixture into the oil in the crankcase. This can result in a low oil level or an increase in the oil level in the sight gauge. Either way, the diaphragms need to be replaced, the oil changed, and the pump flushed out.
If you need to know what type of oil and how much to use in your pump, then visit this page for a comprehensive list of diaphragm pump models and their oil requirements.
Can a Diaphragm Pump be Repaired?
Diaphragm pumps can be repaired. You can generally order any component of the pump through a distributor of your specific diaphragm pump brand, but there are 2 main repair kits that will want to keep on hand:
- Diaphragm Kit
- Valve Kit
Replacing the diaphragms is the most common repair and it is not difficult. This video from Hypro shows how to replace the diaphragms on their D403 pump, but this process will be very similar for all diaphragm pumps such as AR and Udor.
Generally, when replacing the diaphragms you will want to drain the oil as well and completely rinse out the crankcase. This will remove any chemical that has been mixed with the oil.
Winterizing & Regular Maintenance
Diaphragm pumps require regular maintenance. You can refer to your pump manual for specifics, but here are the general guidelines:
| Maintenance Task: | Frequency: |
|---|---|
| Check Pump Oil | Daily |
| Check Gearbox Oil | Daily |
| Change Oil | Every 500 hours or 3 months |
| Change Diaphragms | Every 500 hours or 3 months |
| Valves | 1000 hours |
| O-rings | 1000 hours |
Winterizing the pump is also important to prolong the life of your sprayer unit. You can see a detailed guide on winterizing skid sprayers here that covers how to prep your diaphragm pump for the off-season.
RELATED:
