Adding chemicals to your sprayer quickly, safely, and accurately is important. The use of a chemical inductor tank with a venturi can provide you with these things. You can design your system in a variety of ways but some key principles should be followed to ensure your induction setup operates effectively.
Chemical Inductor Plumbing Components
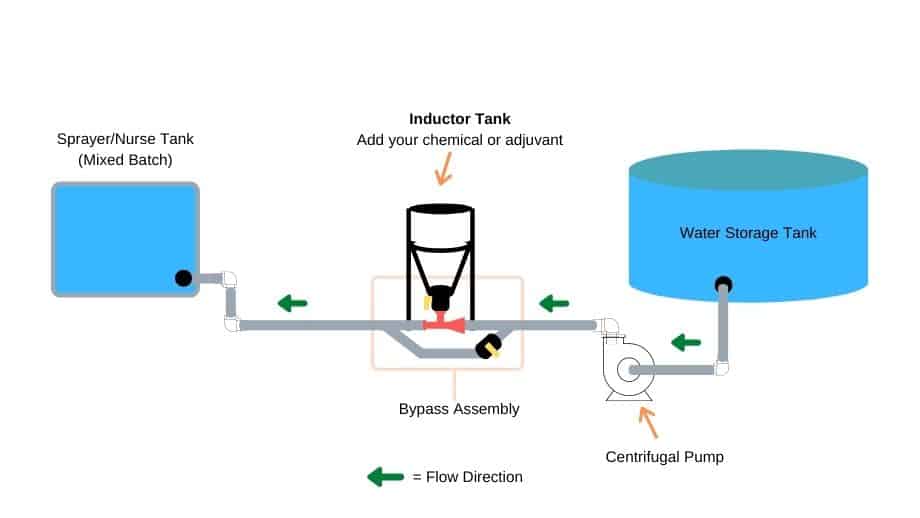
A chemical inductor system is more than just a cone bottom tank. Many pieces work together to create the suction or venturi effect that draws your added chemicals or adjuvant into the sprayer load. There are different options for each component but whether onboard a sprayer or on a tender trailer, the main components will essentially be the same.
Venturi Bypass Assembly
The venturi bypass assembly (shown in the orange rectangle) is the key to the system. It is what creates the suction needed to draw in your agrochemicals, AMS, crop oil, etc. The assembly is made up of the venturi, the bypass valve, and the appropriate plumbing fittings.
Venturi Inductors for Tender Trailers
There are different sizes of venturis for different applications. For a tender trailer setup with a gas engine drive centrifugal pump, you will want to use a full port venturi manifold to provide you with the greatest flow possible. Banjo offers a manifold flange version that works well (shown below in the orange box). You can order all the components separately or order the manifold already assembled to install on the bottom of your inductor tank.
There are many aspects to consider when plumbing an inductor and tanks on a tender trailer or water wagon. You can find more tips in this guide on plumbing a tender trailer. It goes into greater detail on the hose, fittings, pump size, etc.
Inductors on Sprayers
Onboard sprayer pumps have different attributes than your typical gas-engine drive transfer pump. They are usually hydraulically or PTO driven and they may operate at higher rpm and pressure. If you are adding an inductor tank to your sprayer you want to be sure the venturi is sized to work with an onboard sprayer pump. The Hypro Cleanload inductors have specific units made for sprayers and tender trailers.
Inductor Tank
A cone-bottom polyethylene tank is the best option for ag use. There are many sizes available, 15-110 gallons are commonly used. A 16-inch vented lid is recommended to provide easy access for adding products. The vented lid will allow the tank to drain while the lid is closed.
How Big Should Your Sprayer or Chemical Inductor Tank Be?
An inductor tank size does not increase the rate at which your chemical will get drawn into your mainline. A larger tank will only serve to hold more product with the discharge valve on the bottom closed. This comes into play if you are measuring out amounts using the gallon indicators on the side of the tank and then opening your valve to allow the venturi to suck in the liquid.
If you have your products pre-measured or use meters as you add, then you can leave the valve on the bottom open and allow the venturi to pull in liquid as you add. You can easily expect your inductor system to pull in 30 or more GPM from the cone bottom tank. In many cases it will be faster, pump flow rate is the main factor.
Pump for Inductor System
A centrifugal pump is required to create the necessary flow for an inductor to work. The common venturi inductor assemblies are made of 2-inch full port fittings. These will need a 2-inch gas-engine drive pump with at least a 5-horsepower engine to push enough water through the venturi. If you want to use 3-inch plumbing, you can use a 3-inch pump and inductor assembly.
Hose for Chemical Inductor Setup
Your hose should be the same size as your pump and inductor assembly. If you use a three-inch pump, then you need to supply it with a 3-inch suction hose and a 3-inch discharge hose.
How a Chemical Inductor Works
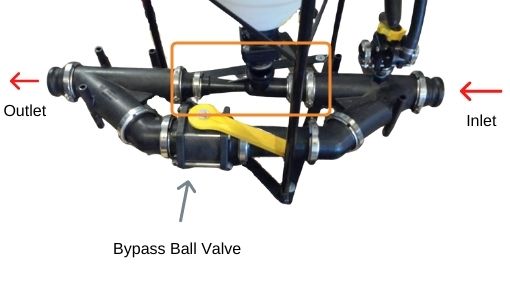
Chemical inductors work by using the flow generated by a centrifugal transfer pump to produce suction in the cone bottom inductor tank. This suction occurs because the flow is forced through the venturi nozzle (colored red in the image above), when this happens the velocity of the liquid increases and results in a decrease in pressure as it exits the venturi nozzle. When the pump is supplying adequate flow, the lower pressure in the line is enough to create suction that draws liquid from your cone bottom tank.
Chemical induction systems are commonly set up with an inductor assembly that has a bypass line. When the bypass line ball valve is open, flow from your pump will take the path of least resistance and will travel through the bypass line. When you close this valve you force the flow to go through the inductor (venturi) line.
When using a chemical mixing assembly, as shown above, it is key that your inductor tank and venturi unit are on the discharge side of the pump. Placing the inductor on the suction or inlet side of the pump will render the Venturi useless. The high flow from a centrifugal pump is needed to create enough suction in your tank.
Can I Use An Inductor Tank Without a Venturi Assembly?
You can use a cone bottom tank without a venturi assembly. In this case, you would place the cone bottom inductor tank on the suction side of the pump. This will rely on the suction of the pump to draw your chemical in from the cone, instead of the venturi.
If you want to plumb your system without a venturi there are many things to take into account. For instance, you never want to starve the pump of liquid. If you are adding chemicals through your inductor tank, the water supply tank should be fully open to ensure the pump is getting enough water as it draws in the chemicals.
Also, the plumbing on the inlet should at least match the inlet size of your pump. A 1-1/2 suction hose on a 2-inch pump can restrict it enough and starve the pump. This may lead to cavitation and a ruined seal in the pump.
Additionally, the distance the supply tank is from your pump can also lead to potential cavitation. Although most transfer pumps used on tender trailers are self-priming, there is a limit to how far from the supply tank they should be. Try to keep the suction hose length as short as possible to protect your pump and ensure your system functions smoothly.
Finally, if you are using the suction from the pump to draw in your chemical you risk premature wear on the pump. If your inductor tank is empty the pump could draw air into the line, this can lead to possible cavitation. Also, be sure that your pump is compatible with whatever products you are going to be adding to your sprayer and that you have a check valve to prevent chemicals from contaminating your freshwater tank.
How to Plumb Your Chemical Inductor Tank Correctly
Here are some key things to remember for inductor tank system plumbing:
- If you are using a venturi with your inductor tank, the tank and venturi assembly must be plumbed in on the discharge side of the pump.
- If you are using a two-inch pump make sure you are using hose, fittings, valves, and strainers, that have at least a 2-inch inside diameter. The same goes for a three-inch pump.
- You can increase your flow rate by eliminating pressure loss in the plumbing. To do this, avoid 90-degree elbows, fine mesh strainers, and unnecessarily long lengths of discharge hose.
- Place your transfer pump as close to your water supply tank as possible. Centrifugal pumps will “push” liquid much more effectively than they will “pull” liquid.
- Never run your pump dry (unless it is a wet/lubricated seal pump). Before running your pump ensure that the valves on the supply tank are fully open. Shut your pump off immediately when your supply tank is empty.
- Multiple inductor tanks can be used in the same line.
Inductor tank systems are very effective when set up properly. Using the guidelines and information above should get you well on your way to building your system or improving your current setup!
