We have all been there. You mix your chemical, fill your sprayer, and head out to spray. Only to find that when you begin to pump up your backpack sprayer it does not build any pressure. A backpack sprayer full of pesticide that won’t work is frustrating. Let’s take a look at what causes this and what to do about it.
RELATED: Pump Sprayer Won’t Build Pressure?
Why Won’t My Backpack Sprayer Build Pressure?
Backpack sprayers can fail to build pressure for many different reasons. Although there are many different brands, the way they operate is very similar. They have a pump assembly that uses either a piston or diaphragm to develop pressure inside the sprayer tank.
The pump assembly in the backpack sprayer is simple but it requires all the pieces to be in working condition and free of debris or residue to operate effectively. Here are the most common causes of backpack sprayer failure:
- Check valves that are damaged or worn out
- O-rings/seals that are worn out or damaged
- Residue or debris in the check valves
- Pump assembly damaged
- The linkage from the sprayer handle to the piston or diaphragm assembly broken
To fix your backpack sprayer, you need to know which of these is causing your lack of pressure. Knowing a little bit about how a backpack sprayer operates will help you identify the cause and find a solution.
RELATED: Solo Backpack Sprayer FAQ
How Does A Backpack Sprayer Work?
Backpack sprayers generate their pressure through a pump assembly. There are two main types of backpack sprayers: piston and diaphragm. The difference is in the type of pump assembly that is used to generate the pressure in the tank.
We will discuss the basic differences here, but for more details be sure to read my full comparison of piston and backpack sprayer performance.
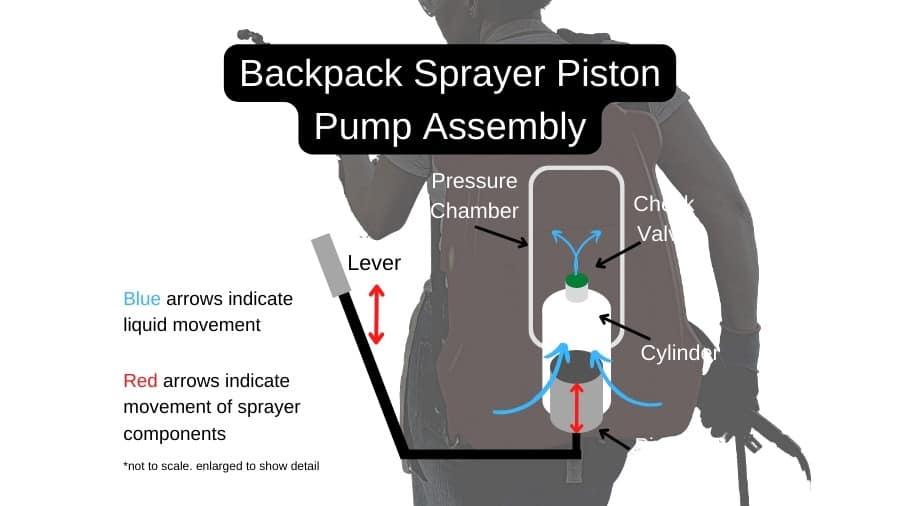
Piston Type Backpack Sprayer
The assembly is made up of the piston, a pressure chamber, and check valves. When you pull the handle up, liquid from the sprayer tank is allowed to fill the piston cylinder. When you push the lever down, that liquid is forced into the pressure tank by the piston. An O-ring on the piston keeps the piston cylinder sealed. A check valve lets liquid into the pressure chamber but does not let it escape. The more liquid forced into the pressure chamber, the higher the pressure you will have forcing liquid out of the spray nozzle.
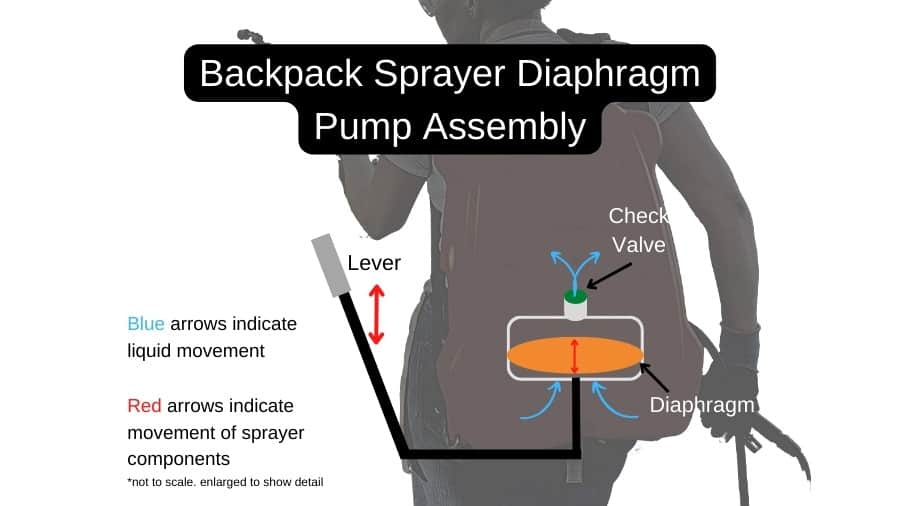
Diaphragm Type Backpack Sprayer
A diaphragm-type backpack sprayer functions very similarly to the piston style. The difference is in the pump assembly. Instead of a piston moving up and down inside a cylinder to push fluid into the pressure chamber, there is a diaphragm that flexes with each stroke of the handle. A diaphragm pump style has some advantages and disadvantages compared to the piston style.
The diaphragm type will have less wear in the pump assembly because no piston fitting tight against the inside of the cylinder/pump chamber. The flexible diaphragm also handles abrasive liquids and wettable powders better than its piston counterpart.
The downside is that the maximum pressure that a diaphragm backpack sprayer can produce is lower than the piston sprayer. Generally, a piston will reach nearly 90 Psi, and a diaphragm maxes out at 50-60 psi depending on the brand and model.
The higher pressure of a piston pump helps to project spray further. If you are interested you can see the results of my test to see how far a pump sprayer can spray in this post about how far a pump-up sprayer can reach.
How to Troubleshoot and Fix Your Backpack Sprayer
Problems developing pressure arise whenever one of the components in the pump assembly breaks, wears out, or gets dirty. When your sprayer doesn’t develop any pressure when you “pump” the lever, you might not be able to determine what the specific cause is. In some cases, you will need to disassemble the sprayer to find the culprit.
Backpack Sprayer Lever Is Hard To “Pump”
If your backpack sprayer won’t build pressure because the lever is very hard to move or wants to move itself back up, then you have a plug either in the pump assembly outlet or the check valves. You will need to remove the pump assembly and examine the check valves.
The most common cause of plugs is chemical residue buildup inside the sprayer. Herbicides and pesticides can gum things up if not thoroughly rinsed. Clean out any gunk and rinse out the pump assembly. Also, ensure the check valves are opening and closing freely.
Occasionally, when you go to pump up your sprayer, the lever is harder to pull up than push down. It may even pull itself down each time you pull the lever up. This is caused when the intake, vent, or screen (if one is present) is clogged. The solution here is to clean out these areas to allow air to fill the pump assembly with each stroke of the lever.
I find triple rinsing the sprayer after each use and using a tank cleaner like Prime Source Tank Cleaner, eliminates this issue. You can find it here very reasonably priced.
If the pump assembly is free of debris and residue but it still is hard to pump the lever, then the pump may be “locked up”. This is due to the lack of air in the pump chamber. If you drain the sprayer completely and work the handle a few times. This should allow air back into the pump assembly so the lever will move freely and build pressure when worked up and down.
RELATED: Backpack Sprayer Buyers Guide
Pumping The Sprayer Lever Does Not Build Pressure
If no pressure is building up and there is little or no resistance when you move the handle, it means that the pump assembly is not sealed up. This can happen for a few reasons. Most likely you will need to disassemble the pump portion to examine the different components for wear, dirt, or damage.
First, you can visually check the linkage from the pump lever to the piston/diaphragm. No matter the brand of the sprayer, there will be some sort of linkage that connects the lever to the piston or diaphragm. There are often small screws, pins, or clips that hold these things in place. These can break, get stripped out, or get lost. Replace these so that the lever once again allows you to cycle the pump assembly.
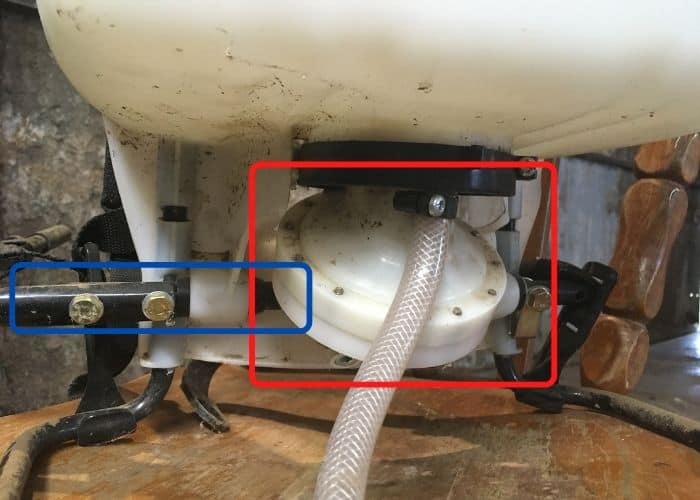
Second, you should examine the check valves. The valve(s) keep the air trapped inside the sprayer tank after your pump assembly forces air inside. If the valve doesn’t close properly due to damage, wear, or debris, you won’t build any pressure as you “pump” the lever.
In many cases, you can remove the pump assembly in your sprayer to rinse out the valves and other components. A good rinse may be all that is needed to get your valves working properly again, but it might be necessary to replace the valves.
RELATED: Solo Backpack Sprayer Review
Another piece of the pump assembly that may fail and result in no pressure in your backpack sprayer is the o-ring or seal on the piston. Without a proper seal, air will escape the cylinder as the piston tries to push air into your sprayer. As with the check valves, it might be necessary to replace this seal.
The final item to check is the piston or diaphragm portion of the pump assembly. Cracks or warped pieces will need to be replaced. You can check to see if your backpack sprayer manufacturer offers repair parts, many do. Often there will be a complete repair kit or entire pump assembly available to purchase.
| Symptom | Cause | Solution |
|---|---|---|
| The lever is hard to move | Internal plug in the pump assembly or valves | Clean and rinse internal components |
| The lever is harder to pull up than down/ Moves down on its own | The air intake/screen/inlet valve is plugged | Clean and rinse air inlet/screen/valve |
| The lever is “locked up” | No air in the pump cylinder/air chamber | Drain sprayer & work handle until pump assembly is moving air again |
| No Pressure + Lever Moves Easily | Pump Assembly/Check Valves not sealed/Damaged | Check linkage from the lever to the piston or diaphragm is not broken. Check the o-ring and check valves for damage. Check pump assembly for cracks. |
Can You Repair a Backpack Sprayer?
Many common backpack sprayer issues can be repaired. The seals, o-rings, plungers, diaphragms, and other wearable parts can be replaced. The major backpack sprayer manufacturers typically provide a repair kit that contains the pieces needed to fix leaks, and lack of pressure. Here are the repair kits for several popular backpack sprayers:
| Backpack Sprayer Brand | Problem | Repair Kit | Models It Fits |
|---|---|---|---|
| Broken piston, linkage from the handle | Leaks, no pressure | 0610406-K | 475-B, 485, 473-D, 475-B-DELUXE, AND 475-101 |
| Solo Piston Backpack Sprayers | Leaks, no pressure | 0610407-K | 425, 425-101, 425-DELUXE, 435, AND 473-P |
| Solo Piston Backpack Sprayer | Broken piston, linkage from handle | 0610409-K | 425, 425-101, 425-DELUXE, 435, AND 473-P |
| Chapin | Won’t build pressure, leaks | 6-8180 | Chapin Piston Pump Style Backpack Sprayers |
| Roundup | Broken piston, linkage from the handle | 181698 | No Leak Model |
How to Keep Your Backpack Sprayer Working
The best way to ensure that your backpack sprayer will build pressure when you pump the lever is to follow some basic maintenance procedures between uses.
Cleaning Your Backpack Sprayer
Your sprayer should be drained after each use. If you are going to spray again later the same day or the next day, it is generally ok to leave the product in the sprayer. If you are not planning to spray again for even a day or two, the tank should be drained. After draining the tank, you should triple-rinse your sprayer. This means running fresh water through the system three times to remove as much chemical residue as possible.
Fill the tank about half full with fresh water. Then you should pump the handle and hold the trigger wand open so that you spray out everything in the tank. Pump the handle a couple of dozen times as you hold the trigger open to ensure that you get a complete drain. You should pump the handle until only air comes out.
Storing Your Backpack Sprayer
Proper storage is also important to maintain your sprayer. When your spraying season is over, remove the hose and wand and open the lid on the sprayer. This will ensure that all the moisture dries out and drains. If possible, store it where it won’t freeze. If that is not possible make certain all moisture is out of the sprayer to prevent cracks and damage from freezing.
As mentioned before, I recommend using Prime Source Tank Cleaner, especially before putting your sprayer away at the end of the season. It is cheaper to use this product than to buy a new sprayer or parts.
Things To Consider
If you use a backpack sprayer a lot you will likely run into an issue at some point, but when this happens it doesn’t have to bring your work to a halt. Hopefully, this post will help you get your backpack sprayer operating normally again and help you maintain it to avoid issues down the road!
