If you are reading this, you are probably frustrated. You went out to get some work down only to find that your hand pump sprayer won’t work. You try to pump the handle but it won’t build pressure. I have been there, and not knowing what is causing this relatively simple sprayer to fail can be aggravating. Especially when it just worked the other day.
Before you throw it away and head to the store to buy another, let’s look at some possible causes and how to fix them.
RELATED: Backpack Sprayer Troubleshooting Guide
How Does a Hand Pump Sprayer Work?
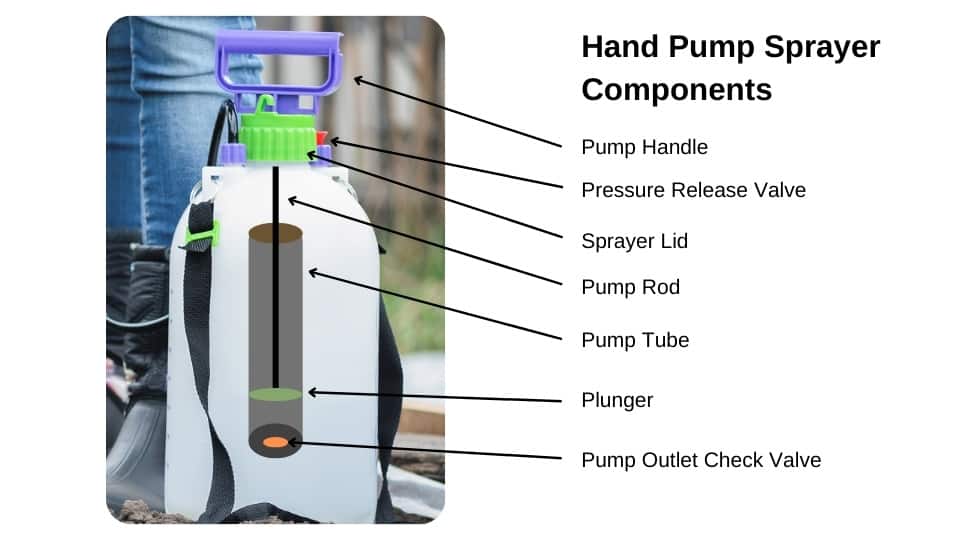
It helps to know how a pump sprayer works and what the different components are called so we can be on the same page. This will help identify the root of your issue.
Here is how a pump sprayer works: Moving the handle of our hand pump sprayer up and down forces air into the sprayer tank. This is accomplished by the pump assembly inside the tank. The assembly is made up of the handle, lid, rod, plunger, tube, and check valve. There is typically an o-ring seal around the top of the tube under the lid, that creates an air-tight seal.
When you pull up on the handle, air fills the tube. When you push the handle down the plunger forces air out of the pump tube and inside the tank. A small check valve at the bottom of the tube allows air into the tank but does not allow liquid to come inside the tube.
RELATED: Are Backpack Sprayers Worth It?
Why is my pump Sprayer not building Pressure?
In order to get your sprayer back to working properly, we need to identify the cause of the problem. Here are some of the common symptoms you might have with hand pump sprayers.
#1: Sprayer won’t build pressure: handle moves up and down too easily.
Causes: The plunger has lost its seal against the wall of the pump tube either because it needs to be lubricated, the plunger is damaged, or it has come off the end of the rod completely. This typically happens as a result of overpumping.
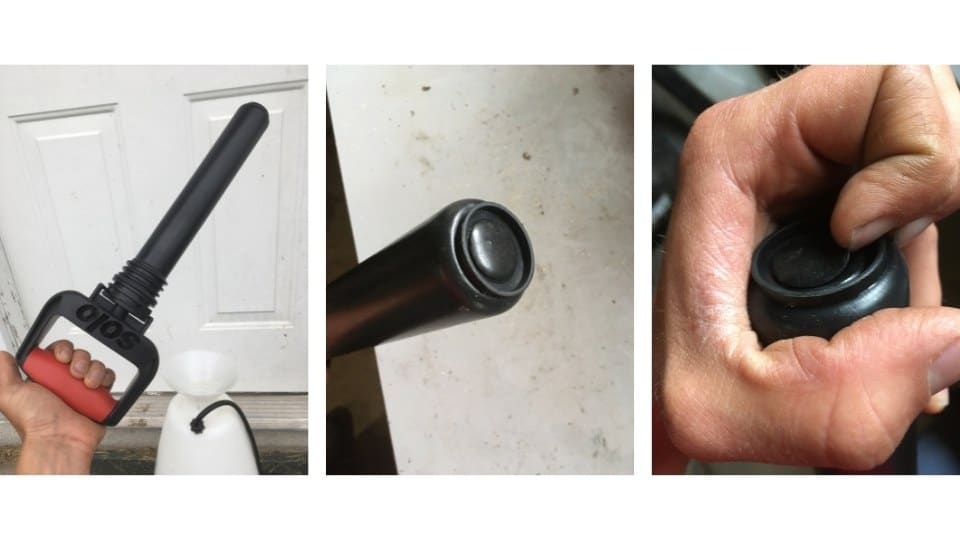
Solution: Remove the pump tube assembly from the tank. You will need to take the pump rod and plunger out of the pump assembly in order to lubricate or fix the plunger. How you remove the rod depends on your brand of sprayer. Most will require a screwdriver or similar tool to help take the pump assembly apart.
With the rod out you can inspect the plunger. Check to see that the plunger is still on the end of the rod and that its shape is intact allowing it to seal against the pump tube when you move the rod up and down. Apply a generous amount of Vaseline or petroleum jelly to the area of the plunger that comes in contact with the pump tube.
RELATED: How to Open a Pump Sprayer

#2: The pump builds pressure, but the tank doesn’t keep it.
Causes: Bad seal around the lid of the pump, dirt/debris on the check valve, crack/seam in the tank.
Solution: If the air leak is due to a bad seal under the lid, you will need to replace the lid o-ring. Many pump sprayer manufacturers offer repair kits that contain the lid o-ring. You can find many repair parts for hand pump sprayers like Solo, Chapin, B&G, and more from Amazon or Domyown.com.
If the lid is sealed tight and the problem still exists, then you can examine the check valve at the bottom of the pump assembly to ensure that it is sealed tight when air is not being forced out of the tube when the handle is pushed down.
Finally, there could be a crack in the tank. Most likely this will be easy to locate, but occasionally a small seam can go unnoticed if it is above the liquid level in the tank. Air will escape when you pump the sprayer and you will never get much pressure inside the tank. You can spray soapy water on the outside of the tank where you think the crack might be (listen for hissing when you pump the handle) and look for bubbles.
A crack can be hard to fix but you might be able to get by for a while before you need to replace the sprayer. You can use duct tape to try and cover it well enough to keep it sealed. You can also try using an epoxy sealer to repair the crack. In my experience fixing a poly tank can be perilous and a new sprayer is usually the solution, especially when the cost of hand pump sprayers is relatively low.

#3: Sprayer builds pressure but nothing comes out of the nozzle or it is low volume/pressure.
Potential Causes: Plug in the outlet screen, or plug in the spray nozzle.
Solution: Chemical residue likes to stick around in sprayer hoses, screens, and nozzles. If your sprayer tank is holding pressure but nothing comes out of the nozzle, then there is most likely a plug somewhere on the outlet portion of your sprayer.
First, check your sprayer tip. This can be easily cleaned out. Remove the tip from the wand and run fresh water or blow air through it to clean it out. If you still have a plug, then check the spray gun. Your spray wand or spray gun might have an internal screen that can get plugged up. This will vary depending on the brand of the gun. Also, inside the tank, there is a suction tube. This tube usually has an inlet screen. This is another common place for plugs to occur
You can see how I clean out my sprayer nozzles in this article about how to get a sprayer nozzle to work.
#4: Sprayer Handle Stuck or Is Very Hard to “Pump”
Potential Cause: Pumping action can get difficult over time from normal wear and chemical residue building up and drying out pump components.
Solution: Take the pump assembly out of the sprayer. Remove the pump rod from inside the cylinder. Apply a lubricant to the plunger and the o-ring that seals between the cylinder and the plunger. Use a grease that is not water-soluble like Vaseline.
Are Hand Pump Sprayers Repairable?
Most hand pump sprayers will eventually wear out, particularly poly/plastic ones. The seals will eventually dry out or become ineffective over time due to exposure to chemicals. Rinsing and cleaning your spray can make it last longer.
You can repair these types of sprayers assuming that the parts are available. Usually, a repair kit is offered that contains the main wearable components, like the seals and o-rings. Other parts may be available however at a certain point replacing the entire sprayer is a more cost-effective option.
It is easier to find repair parts for some hand pump sprayer brands than others. Here are the repair kits for several common hand pump sprayers:
| Sprayer Brand | Repair Kit | Models It Fits |
|---|---|---|
| Chapin | 6-4601 | 22170XP, 22180XP, 22790XP, 22090XP, 26031XP, 26021XP, 26011XP, G3000P, G2000P, G1000P, 21210XP, 21220XP, 21230XP, 21250XP, 21240XP, 22360XP, 22350XP |
| Chapin | 6-1925 | 31410, 31420, 31430, 31440, 30600, 25020, 25012, 25010, 2803E, 2802E, 29003, 29002, 29001, 2014, 2675E, 10000, 1480, 2658E, 2659E, 2660E, 2608E, 2609E, 2610E, 26030, 26020, 26010, 27030, 27020, 27010, 20030, 20020, 20010, 20000, 20075 |
| Chapin | 6-4646 | 19049, 19069, 19249 |
| Chapin | 6-4627 | 10800, 10700, 1749, 1739, 6300, 1253,1180,1280,1380, 1949, 1979, 1941, 1831, 1352 |
| Solo | 4900405-K | 454, 456, 457, and 457-ROLLABOUT |
| Solo | 0610403-K | 430-1G, 430-2G, and 430-3G |
| Solo | 4900407-K | 454-HD, 456-HD, 457-HD, 456-F, and 407-CI |
| Ortho Roundup Sprayers | Repair Kit with O-Rings, Gaskets, and Nozzle | Fits all Ortho brand Roundup pump sprayers. |
RELATED: Troubleshooting Your Backpack Sprayer
Hand Pump Sprayer Maintenance
Propper maintenance of your sprayer will be the best defense against any potential sprayer issues. It takes a little extra time but it can save you frustration in the future.
After each use, you should thoroughly rinse and clean off your sprayer. It is recommended that you fill your sprayer about half full, shake water around the inside and dump it three times. This will reduce the amount of chemical residue left behind down to very low levels. You should also run fresh water through the hose, spray gun, and nozzle.
Store the sprayer with the lid open and the sprayer gun locked in the open position. This lets the sprayer completely drain. At the end of the spray season, use a tank cleaner to wash the tank out for off-season storage.
As mentioned before, you can lubricate the plunger inside the pump with petroleum jelly or silicone grease. This keeps the plunger from drying out and maintains the tight seal necessary to build pressure in the sprayer.
If you are new to lawn and turf spraying, you can check out this article on building a sprayer yourself.

Backpack Sprayer
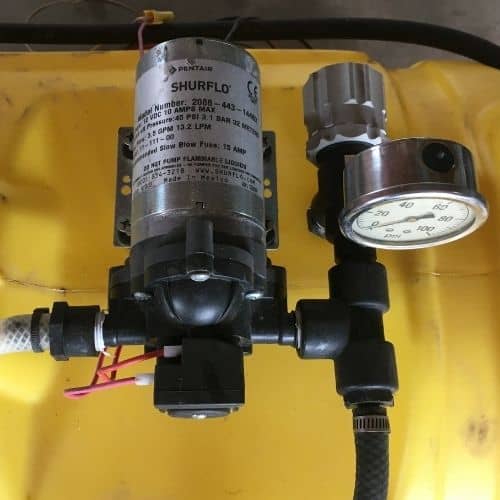
12 Volt Sprayer Pump
Spray Wand
