The operating pressure plays a vital role in determining the performance and functionality of your sprayer. It can affect the uniformity of your spray nozzle pattern, the distance you can reach, the droplet size, and your application rate. This makes it extremely important for you to be able to easily adjust the operating pressure of your sprayer.
The method used to make changes to the pressure on a sprayer depends on the type of sprayer and sprayer pump being used. Having said this, in most scenarios, a regulating valve is used to increase or decrease the pressure. The regulating valve “bypasses” liquid from the main discharge line back to the tank.
Increasing the amount of liquid that is bypassed will decrease the operating pressure while decreasing the amount of liquid that is bypassed will increase the pressure in the discharge line. Increased pressure results in a greater volume of fluid being dispersed by the sprayer in a given amount of time. Let’s look at the specific methods that are used to adjust pressure on different sprayer types.
12-Volt Sprayers
A 12-volt sprayer is a common type of sprayer used for spot spraying or small boom sprayers. They are called 12-volt sprayers because they employ 12-volt diaphragm pumps. These pumps are equipped with a pressure switch.
The pressure switch on the pump is designed to turn the pump on and off based on the pressure in the system. When the pressure reaches the high set point, the switch turns the pump off. When the pressure drops below the set level, the motor on the pump begins to run again. This feature shuts the sprayer off when the trigger gun is shut or the boom valves are closed.
Adding a regulating valve to these pumps allows the user to maintain constant pressure in the line by relieving excess pressure when needed. It allows you to control the pressure downstream of the valve, ensuring a consistent spray pattern from the sprayer and avoiding cycling on and off. You can learn more about this in the article “How to Prevent Your Pump From Surging”.
Adjusting the Pressure on a 12-Volt Sprayer
- Locate the Adjustment Knob and Locknut:
- The regulating valve will typically have an adjustment knob and a locknut. The adjustment knob changes the pressure setting, while the locknut secures the setting in place once adjusted1.
- Adjust the Pressure:
- Turn the adjustment knob clockwise to increase the pressure, and counter-clockwise to decrease the pressure. As you make adjustments, monitor the pressure gauge to ensure you are within the desired pressure range.
- Secure the Setting:
- Once you’ve achieved the desired pressure, tighten the locknut to secure the setting. This will prevent the pressure setting from changing as the system operates.
Check the Pressure Switch Setting
- If necessary, adjust the pressure switch on the pump to ensure it is set to a suitable range that matches the pressure setting on the regulating valve. Turning the screw on the pressure switch clockwise will make the switch more sensitive.
- Check for System Issues:
- Inspect the system for any leaks, blockages, or other issues that may be causing the rapid cycling. Resolve any issues found.
This step-by-step process and understanding of the relationship between the pressure switch and the regulating valve should provide a clearer picture of how to accurately and effectively adjust the pressure on your 12-volt sprayer.
Turf Sprayers with Roller Pumps
Roller pumps are another common pump type that can be used on sprayers. They do not have a built-in pressure switch like 12-volt diaphragm pumps. The pressure is often controlled by the engine speed and the similar type of regulating valve that is used on a 12-volt sprayer. Roller pumps often can produce a higher psi, so a regulating valve capable of handling higher pressures is needed.
Pressure Regulation on Sprayers with Roller Pumps

- Locate the adjustment knob and locknut on the regulating valve.
- Turn the adjustment knob clockwise to increase the pressure, and counter-clockwise to decrease the pressure. Monitor the pressure gauge to ensure you are within the desired pressure range.
- Once the desired pressure is achieved, tighten the locknut to secure the setting. This will prevent the pressure setting from changing as the system operates.
- Once the pressure has been adjusted, test the sprayer to ensure it’s operating at the desired pressure and that the spray pattern is correct.
- Make any necessary fine-tuning adjustments to the pressure settings on the regulating valve to achieve the desired performance.
Turf and Pest Control Sprayers with Diaphragm Pump
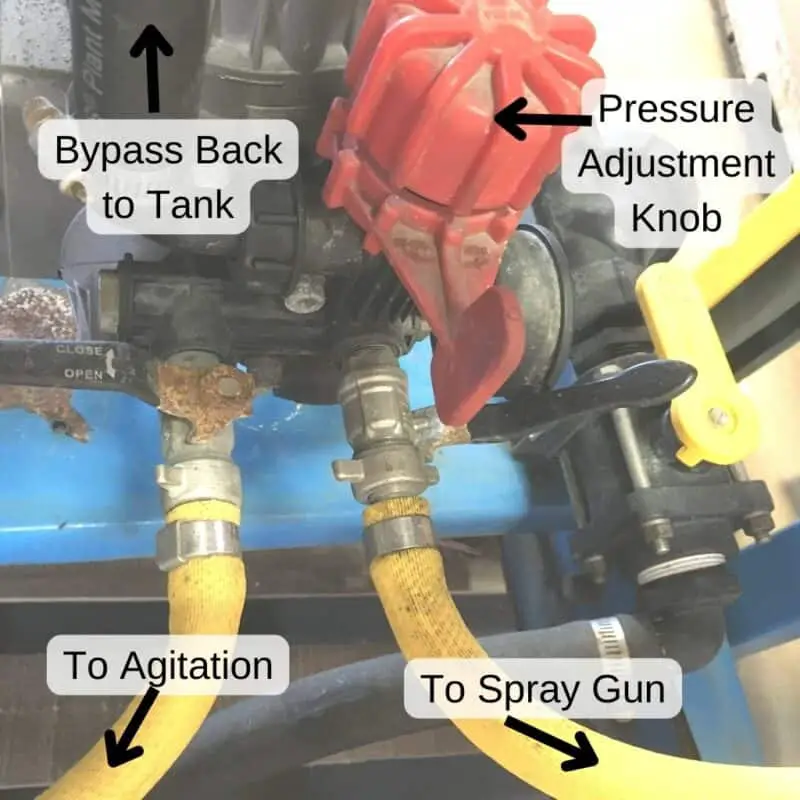
Commercial sprayer rigs for trees and large-scale pest control utilize medium and high-pressure diaphragm pumps. With higher operating pressures, the need for safe and precise pressure control is crucial. These pumps are typically equipped with a pressure control unit made up of a regulating valve, pressure gauge, and valves to direct flow.
Proper installation and operation of the control unit is vital to safely using a skid sprayer with a high-pressure diaphragm pump. The images below show the proper installation of a GR40 pressure control unit for a Hypro or AR diaphragm pumps.

Adjusting the pressure on a pest control skid sprayer using a diaphragm pump and pressure control unit requires a systematic approach to ensure accuracy and effectiveness:
- Understand the Pressure Range:
- Familiarize yourself with the pressure range capabilities of your diaphragm pump and the desired pressure range for your spraying task.
- Initial Setup:
- Ensure the engine is off and the pump is not holding any pressure.
- Ensure that all connections are tight and secure.
- Adjust the Pressure Regulator:
- Set the control unit to the full bypass position.
- Start the engine and activate the pump.
- Slowly turn the pressure regulator knob to increase the pressure while monitoring the pressure gauge to ensure it’s within the desired pressure range.
- Once the desired pressure is achieved, ensure that the regulator knob is securely tightened to maintain the pressure setting.
- Test the Setup:
- Spray a small amount of water to ensure that the pressure is consistent and the spray pattern is as desired.
- Adjust the pressure regulator knob as necessary to fine-tune the pressure settings.
- Maintain the Equipment:
- Regular maintenance is key for optimal performance. Refer to the manufacturer’s maintenance instructions and ensure that the diaphragms and other parts are in good condition.
- Safety Precautions: Always start the pump in full bypass.
This generalized process should assist in adjusting the pressure on various pest control skid sprayers using diaphragm pumps and pressure control units, though specifics may vary based on the exact models of equipment being used. Always refer to the manufacturer’s manual for the most accurate and detailed instructions.
Controlling Pressure on Sprayers with A Centrifugal Pump
Centrifugal pumps are a little different than the other sprayer pump types we have discussed in this article. All the other pumps are positive displacement pumps which means they push liquid through the pump with a mechanical action. If the outlet is blocked or a discharge valve is closed they continue to build pressure.
Centrifugal pumps, on the other hand, use centrifugal force. If the outlet is blocked or the valve closed, they only build pressure to a certain point. For many centrifugal pumps, this is no more than about 100 psi. This means that a bypass or pressure relief valve is not necessary, and there are different methods that can be employed to adjust the pressure.
Different Control Methods:
- Pressure Regulating Valve: You can control the pressure on a centrifugal pump in a similar manner to roller pumps or 12V diaphragm pumps. Using a regulating valve to control the pressure in the main line and bypass excess liquid.
- Pump Speed: The pump speed can be controlled by various methods. Increasing the pump speed increases the volume of liquid being discharged and in turn the pressure. The rpm of whatever motor or engine is driving the pump can be adjusted to change the pump speed.
- Nozzle Size: As mentioned earlier, with centrifugal pumps there is little worry or danger of building too much pressure. This means that a regulating or bypass valve is not required. If this is the case, then the pressure of the system is determined by the volume of liquid the pump is producing and the size of the spray nozzle(s) being used on the sprayer. The nozzles will only allow so much fluid to pass through them at a certain pressure. A nozzle chart will tell you the low capacity of your nozzles. If you are unfamiliar with nozzle sizes and types, definitely check out this article that fully explains identifying and correctly sizing sprayer nozzles
Key Takeaways
Adjusting the pressure on a sprayer is crucial for optimal performance and is achieved differently depending on the sprayer type. Common sprayers require a simple setup and adjustment process due to their high-pressure pumps, while centrifugal pumps offer varied pressure control methods like altering pump speed or nozzle sizes. Across all types, understanding your sprayer’s mechanics and consulting the manufacturer’s manual is essential for effective and safe pressure adjustment.
