A dust control sprayer is similar to other types of sprayers. The components and controls are similar, the main difference is in the volume of liquid that they spray. Dust control sprayers are typically designed to apply a lot more water to the surface when compared to other sprayers like agricultural and turf sprayers. This means that the required pump, tank, and plumbing will need to be larger.
Today we are going to go through all the specific components needed for a basic, DIY dust control rig with manual controls, and I will also list and show the components needed for remote electronic controls. These setups are extremely versatile, and with a few modifications, they could be used for de-icing/anti-icing and spraying herbicides/pesticides.
Basic Parts of a Dust Control Sprayer
- Tank
- Pump
- Boom
- Valves
- Nozzles
- Regulating Valve
- Hoses
- Fittings
Parts List for Basic DIY Dust Control Rig
Tank
The size of the tank is your preference. Think about how many gallons you will apply per minute and how often you will be required to re-fill. Then compare with your budget for the project as well as the space you have to fit the tank.
Water tanker trucks with steel tanks are often used for dust control but you can use poly tanks. They can be installed on about any truck, flatbed, or trailer. There are virtually limitless sizes and shapes available.
Options:
- Elliptical tanks
- Leg tanks
- Round tanks
You can see some tips for selecting tanks in this article on building a water truck.
Pump
High high-volume centrifugal pump will be required to generate the necessary flow to be effective. For water or even calcium chloride brine mixtures, you do not need anything fancy. Banjo and Pacer pumps offer very affordable poly pump and engine units. They are self-priming and can easily produce a maximum flow rate of over 150 gallons per minute.
Cast iron centrifugal pumps will be more durable, but they are also more costly. The flow rates they produce are relatively similar. A 2-inch poly pump driven by the same rpm and hp as a 2-inch cast iron pump will have very similar flow rates.
Hydraulic-driven pumps can be used if you have a truck or tractor with a hydraulic system to operate it. Be sure to size the hydraulic motor of the pump to your hydraulic system.
Boom
The spray boom may seem like the most difficult piece of the sprayer to construct. However, for dust control, you do not need anything elaborate. in fact, in many situations, you might not even need a boom at all. The main concern is getting plenty of liquid to the nozzles. This means using a large enough pipe or hose.
When you are using large flood nozzles recover such a wide area that you may only need a few nozzles. Two or three nozzles mounted on the sprayer and fed individually with separate hoses. Eliminating the need for a Conventional rigid spray boom.
Nozzles
Whether you are spraying water or calcium chloride, you need nozzles that apply a large volume of liquid. Flat fan nozzles can be used, but flat fan nozzles are generally limited in their size. For many applications, you will need to use another nozzle type to achieve the high volume needed.
Flood nozzles and boomless nozzles are great options for dust control. They provide high volume and eliminate the need for a traditional rigid boom. This means fewer components that will potentially require maintenance on your equipment.
Flood nozzles are designed to develop a wide, high-volume, fan-shaped spray pattern, covering a broad area with water or dust suppressant. This saturates a large surface quickly, effectively controlling dust. Boomless nozzles are mounted on the side of the sprayer and project a directional spray over a wider swath. They are ideal for controlling dust in areas with obstacles and uneven terrain.
Super large volume applications will require nozzles that are essentially just ends of pipe with the outlet shaped to disperse the water over a wide area.

It is hard to describe the pattern of a spray nozzle, view this post to see some examples of various boomless nozzles.
What Size of Nozzle Do I Use?
There are different methods for dust control, but here we are focussing on surface wetting for dust suppression. Any of the nozzle types discussed above will work depending on the flow rate you need and the width of coverage you want.
Small dust control sprayers that fit in trucks or ATVs used for driveways, or isolated work sites, may get away with a spray bar and flat fan nozzles that put out about a gallon a minute. Larger construction sprayers will require huge “duck bill” style nozzles to soak the ground.
The size of the nozzle will not need to be as precisely calculated as in herbicide and pesticide applications. It may take some trial and error to see how effective a certain nozzle is before you decide.
Hose Reel
A Hose reel is not required but it is a great option if you want to manually spray down areas that your sprayer might not be able to access. For dust control, You will want at least a ¾ inch hose. Anything smaller than that you will not have enough flow and I can take a long time to spray something down. If you use a hose larger than 1 inch then it becomes heavy and gets hard to handle.
Controls
Dust control sprayer does not require any sophisticated controls to be effective. You simply start your pump and the way you go. However, to make your sprayer much more convenient and versatile you can add some simple on/off valves that will allow you to turn the sprayer on and off from the cab of your truck or tractor. You can also control nozzles individually so that you can spray only one or two nozzles at a time if necessary.
There are many different sprayer control options. They vary in complexity, from manual controls to automatic control and GPS mapping. We will take a look at a basic control setup here, if you would like more information refer to this article that breaks down the different types of sprayer controls.
When I say basic controls, I am referring to the ability to turn the pump on and off from the cab of the truck or vehicle. Also, electronic on/off valves that let you control each boom section or individual nozzles. This is accomplished with a control console that is in the cab, electronic ball valves, an electronic motor starter, and wire harnesses that connect it all.
Dust Control Sprayer Diagram
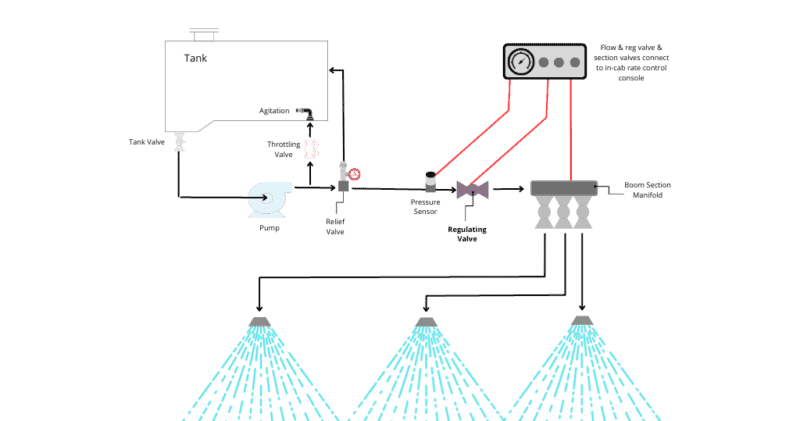
Dust Control Sprayer Assembly & Plumbing
The assembly and plumbing of a dust control sprayer are pretty intuitive. As shown in the diagram above, the plumbing and setup is simple but there are some things to keep in mind to avoid some pitfalls.
Plumbing
As mentioned earlier, when plumbing a dust control sprayer is the size of the plumbing. The hose, fittings, nozzles, etc. need to be adequately sized. What does adequately sized mean? Basically, once you have determined the size of nozzles you need (this is done by determining how much water you want to apply), you then need to determine the size of the pump needed to accommodate the nozzles.
If you use a two-inch pump, then you need to have a two-inch suction hose feeding the pump inlet from the tank. Likewise, use a three-inch hose if you are using a three-inch pump. The discharge plumbing should be the same size as the inlet if possible. This will maximize the output that you can achieve. Avoid any “choke” points by maintaining the same size pipe fittings throughout the plumbing.
