Building your own sprayer is pretty simple. You just need a tank, pump, boom, and some plumbing components. Building a sprayer with the ability to adjust pressure, adjust, your application rate, and control section valves, is where it can get complicated.
So let’s examine the components you need, and how to plumb them together to build your own sprayer with electronic controls.
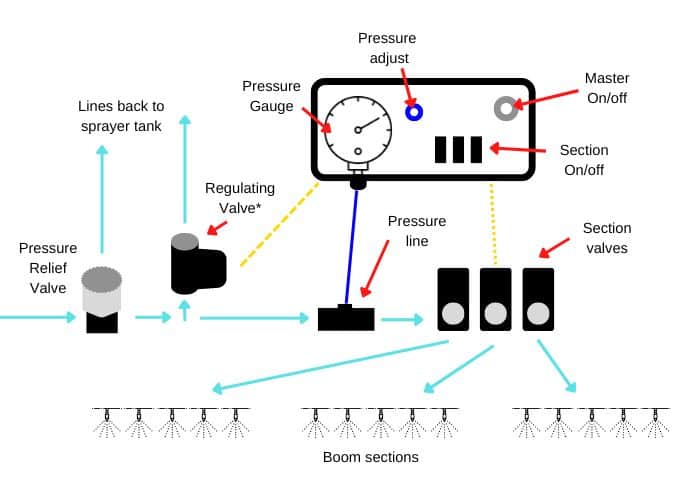
Electronic Sprayer Controls Overview
The most basic sprayer control is your spray nozzle(s). If you build a sprayer with no regulating valve, your output will be based on the nozzle size and pump output. The only way to adjust your application rate is to change the speed at which you spray or change to a different nozzle size.
If you want to maintain a constant rate without having to change the nozzles, you can add a pressure-regulating valve to your sprayer. This will give you the ability to adjust your pressure manually. Increasing pressure will increase your output, even if the nozzle size remains the same. Likewise, decreasing pressure will lower your output.
This means you can calculate the pressure needed to apply a certain application rate at different speeds. When you change the speed you can adjust the pressure to that setting. This works fine if you are physically located near your regulating valve, but in many cases, your sprayer pump and regulating valve are not located next to your seat. Whether it is an ATV/UTV sprayer, pull-behind sprayer, etc. You would have to stop and go make the adjustment.
Which leads to the need to remote mount the regulating valve and pressure gauge. This requires more plumbing and hoses full of your spray solution running near your cab or seat. It also can be hard to make adjustments this way while driving. Electronic controls are easier to use and don’t require extra plumbing.
Electric Sprayer Control Systems: Manual vs Auto Rate
There are two types of electronic sprayer rate control. Automatic and manual. I detail the difference more in this post on sprayer plumbing*. But here are the basics. Automatic rate control adjusts the sprayer output automatically as you change your speed. You set a rate on a sprayer rate controller and it does the work for you.
This is also called “flowmeter control”. This is quite the investment as it requires speed or GPS sensors, a rate control console, a flow meter, regulating valves, etc.
Manual electronic rate control gives you the ability to adjust the rate on the fly from your cab or the operator seat but you have to press the switch to make the adjustment. This is called “pressure-based control”. It requires that you know what pressures will produce your target rate at different speeds. This requires some pre-calculations but it is significantly less expensive than auto rate control.
What Type of Sprayer Control Is Right for Me?
If you are wondering what type of sprayer controls would fit your specific scenario, here are some factors to consider.
Do You Need to Adjust Your Rate While Spraying?
You may find that you do not have a need to change your rate while you are spraying. If you spray the area that is flat with no obstacles you may be able to spray at a constant speed and adjusting your rate to match your speed it’s not a big issue for you.
The consistent application that pressure-based sprayer controls provide can save you money from applying chemicals. This will also provide you with better results from herbicides, fertilizer, etc.
Does Your Sprayer Have a Boom or Spraygun?
If your sprayer does not have a boom but it is a skid-style sprayer for tree spraying, fire suppression, or spot spraying, then electronic spray controls may not be necessary. In these scenarios, you are less worried about a consistent application rate and more worried about achieving the proper spray distance and volume.
If this is your scenario, you would not need a rate controller, but a manual pressure control like the Hypro GS40 shown below. You can preset different operating settings and adjust them easily during operation.

Do You Want Boom Section Control?
One feature that is pretty standard on agricultural sprayers, and the de-ice sprayers used by municipalities, is boom section control. This allows the operator to shut off portions of the boom when they are not needed. This prevents unnecessary overlap and gives the operator some flexibility.
With a small spray boom, you probably don’t need to control multiple boom sections with separate on/off valves. However, if you have a small boom and a spray gun, it is nice to have a way to control and direct flow to either the boom, spray gun or both. This can be done with a manual controller or electronic valves.
The Tee Valve manual sprayer controller lets you direct flow to multiple sections or spray guns/accessories. It also has a port for a pressure gauge.

How Much Do You Spray?
If you only need to spray a single lawn or have a sprayer with a small boom, then I would suggest keeping it as simple as possible, although it is nice to have electronic controls on your sprayer, they do create more potential for things to fail. This can cause you to spend more money and time on your sprayer than necessary.
Applications Where Manual Electronic Spray Control Is Ideal:
- De-ice spraying parking lots or sidewalks
- Turf spraying
- Pasture spraying
- Golfcourse spraying
- Dust control
Applications where Auto-Rate Control is Recommended:
- Agriculture spraying
- Variable rate applications
- De-ice spraying on roads and highways
Components Needed for Electronic Sprayer Control
There are a few ways to set up a sprayer with electronic pressure control (manual rate control) and boom section control, but these are the components needed:
- Control Console
- Boom section valves
- Regulating valve
- Pressure sensor (Often included with console)
- Wire harness/cables & 12-volt power supply
There are a few companies that offer kits that supply you with the necessary components to get up and running. They have different options for valve type, size, etc. But you can piece the components together based on what you already have.
If you are starting from scratch, Teejet makes a kit that will include all the components you need for 3 boom sections and remote manual rate adjustment. You can find this affordable version on Amazon.

Let’s look at each component a little closer.
Controller Console
The brain of the setup is the sprayer control console. When spraying, you can control your rate by adjusting the pressure toggle switch. The console also will have a bank of switches to control your boom section valves.
The console typically has a pressure gauge built-in with a pressure line that runs to the gauge from your discharge plumbing. A 12-volt power supply is necessary to operate the switches on the console.
Boom Section Valves
There are two types of sprayer valves used, motorized ball valves and solenoid valves. The motorized ball valve style is a better option. Depending on the amount of usage, solenoids may need to be rebuilt almost every year, while ball valves can last years. Motorized ball valves are more expensive, however.
If you are unfamiliar with the difference between solenoid valves and ball valves be sure to read this article where I explain the difference between these valves in detail.
Electronic Regulating Valve
When you adjust your sprayer operating pressure on the control console what you are actually doing is opening or closing the regulating valve. This allows more flow or less flow to your spray boom. The change in flow results in higher or lower pressure.
A regulating valve is similar to a motorized ball valve. The difference is that the motor or actuator is designed to rotate and stop in any position, where the on/off valves open or close completely when the switch is flipped.
Pressure Gauge/Sensor
In order for you to make adjustments to your sprayer output, you must be able to monitor the operating pressure of your sprayer. To achieve this you must have a pressure gauge visible to you as you spray. Whether the gauge is part of the control console, or it is mounted remotely, a small tube is run to the gauge from the boom supply line to the gauge.
If you don’t like the idea of your spray solution running to a gauge in your cab or seat, there are digital control consoles that use a digital pressure sensor. This will have a wire harness that runs from the pressure sensor to the console.
Wiring/Power Supply
For permanent installation, you can run the power supply directly to your battery, but if you want to be able to move your controls from one machine/truck to another, you can use the 12-volt power outlet. Wiring will also be required for each valve, sensor, and console.
Simple Electronic Sprayer Control Plumbing
Getting the right components is half the battle. Installing them correctly is crucial to ensuring your controls will be effective and your application rate will be accurate.
I have several different plumbing diagrams for pressure-based sprayer setups in this article on roller pump plumbing. The guides will provide a general layout of your plumbing and where to place the regulating valve, bypass, etc. Even if using another style of pump like a centrifugal, 12-volt, etc, these guides are applicable.
There are different ways to plumb your sprayer to achieve the functions that we need for pressure-based electronic sprayer control. Here is a detailed layout of all the components.
If you are looking for more sprayer plumbing diagrams, then examine this article, where you can see a full plumbing layout for pressure-based spray controls.
How to Calculate the Pressure Needed to Maintain Your Application Rate at Different Speeds
The ability to change the output of your sprayer with a toggle switch during operation is pointless unless you know what your GPM (gallon per minute) output is at different operating pressures.
When you increase or decrease speed, you must increase or decrease your output in order to maintain your application rate. Unless we know the output of the sprayer at different operating pressures it is impossible to know how much to adjust your pressure to maintain the same rate.
Your sprayer output is determined by your nozzle size and operating pressure. Your spray nozzles will produce a certain flow rate at 30 psi and a different flow rate at 40 psi. If your speed is constant but you increase pressure, you increase your application rate. If you lower pressure and maintain speed, you decrease the rate you are applying. Likewise, if you speed up but do not increase pressure your rate will drop, and if you slow down but maintain the same pressure, your rate increases.
Let’s look at an example. Your target application rate is 10 gallons per acre, you want to travel an average of 5 mph, and your nozzles are spaced 20 inches apart. This means that you need 0.168 gallons per minute flow from each nozzle to achieve your rate. The formula used to find this flow rate is GPA x mph x nozzle spacing, then divide that number by 5940. If you would like more information on how to calculate GPA or GPM from your nozzle, I wrote an entire article about spray nozzle calculations.
The spray nozzles that you have on your sprayer, will have a chart that displays their flow capacity at different pressure. Usually, they will show 20-60 psi. In the chart, you will find what pressure will give you 0.168 gallons per minute from your nozzles.
Now, let’s say you need to reduce speed to 3 mph while spraying. To maintain the same per-acre rate, you need your nozzles to produce 0.1 GPM. Again, we refer to the nozzle chart and note the pressure that is needed for 0.1 GPM.
If sprayer nozzle charts and numbers are new to you, be sure to view this article, all about spray nozzles, it explains everything about them in more detail.
With a few calculations ahead of time you can record the operating pressure needed at multiple speeds. This way you will know that you are hitting your target rate when you change speeds.
Final Thoughts on Sprayer Controls
Sprayer controls may seem complicated, but there are simple ways to control your sprayer, no matter how big or what you are spraying. Using pressure-based control, you can easily change sprayer output and maintain your application rate without spending lots of money on expensive flow meters, consoles, GPS, etc.
