One of the great aspects of agricultural or turf spraying is the versatility of the equipment. Existing sprayers can be modified or adjusted to accommodate different applications. The key is to ensure that things are properly plumbed and installed in order to achieve your desired outcome.
Plumbing for Different Sprayer Pumps
There are a handful of main pump types used on sprayers. They are divided into two main categories: positive displacement and centrifugal pumps. The difference between these two types of pumps is not only the flow and pressure they can produce but also the way they need to be plumbed in a sprayer setup.
Positive displacement pumps need to have pressure relief valves in the discharge of the plumbing. If you close the discharge of a positive displacement pump it will build pressure until something gives. Usually, hoses, clamps, or fittings.
Non-positive displacement pumps are usually centrifugal pumps. They will not continue to build pressure when the discharge is closed. The fluid in the pump may heat up if left uncirculated for long, but there is a maximum pressure that a centrifugal pump will reach when dead-headed (meaning discharge is closed). This is usually less than 100 psi for most centrifugal pumps although there are some sprayer pumps that can achieve more.
The pump is the central part of any sprayer, so it is important to know the characteristics of your pump to ensure proper hose, valves, and fittings are used to allow adequate flow and ensure the components can handle the pressure produced by the pump.
One of the most important aspects of plumbing your sprayer pump properly is to provide an adequate suction line or hose to the pump. Centrifugal pumps need to be supplied with a suction hose that won’t collapse under suction that has an inside diameter equal to or larger than the pump inlet. This will keep the pump from cavitation from lack of liquid, which will cause seal failure.
Positive displacement pumps also need to be supplied with the correct size hose. Some roller pumps and diaphragm pumps will actually recommend using a suction hose larger than the pump inlet at high pump rpm.
Sprayer Pump Types:
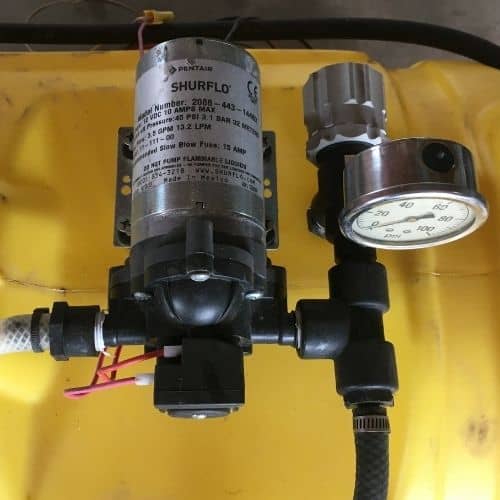
- 12-volt pump
- Centrifugal pump
- Roller Pump
- Diaphragm pump
- Piston Pump
Related:
What Size Sprayer Pump Do I Need?
Your pump should have a flow rate large enough to meet the GPM flow requirements of your boom and your agitation line plus any other accessories that require flow during operation. You should add 20% to this total to give you the flexibility to speed up or use larger nozzles.
Related:
Do I Need A Bypass For My Sprayer Pump?
For positive displacement pumps and oversized centrifugal pumps, you will want to have a bypass installed on your sprayer. This should be a dedicated line. For a centrifugal pump, a gate valve will serve to limit the flow going to the boom. If you have a positive displacement pump you need a pressure relief valve. This will release excess pressure over a set amount, and protect the sprayer plumbing components from damage. If you are new to sprayers, be sure to read this post that goes into more detail on pressure relief/regulating valves.
Sprayer Plumbing & Components
There are two main types of sprayer plumbing setups: Pressure based and Flowmeter based. Below you can see a simple layout for each type.
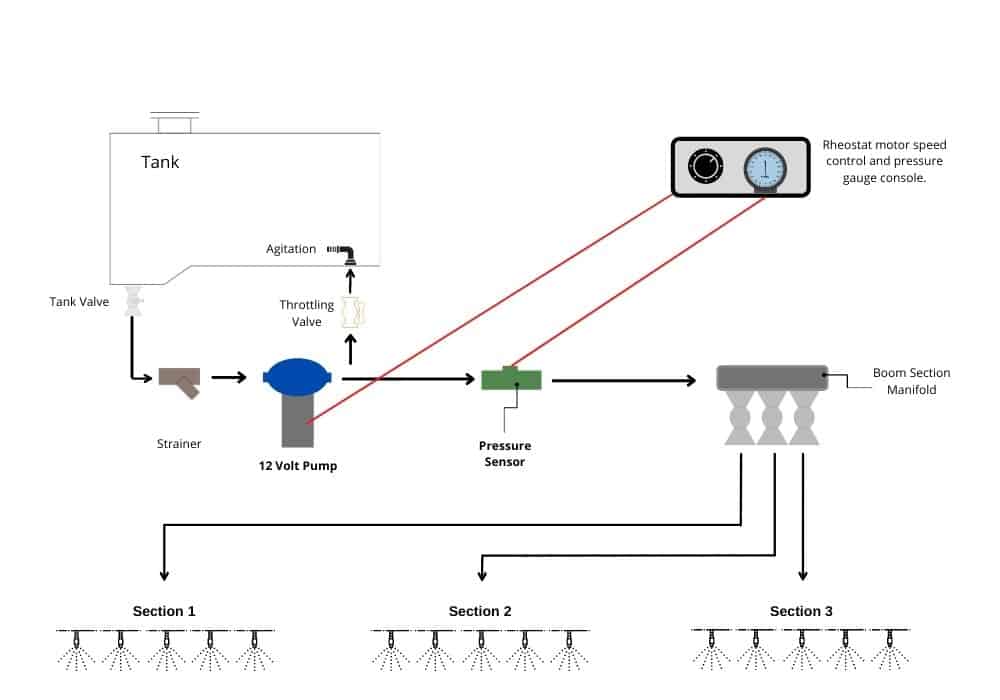
Pressure-Based Sprayer Plumbing
The simplest and lowest-cost way to plumb your sprayer is manual pressure-based control. This is how most ATV sprayers and turf sprayers are designed. This setup will not allow for easy adjustments on the fly. Depending on where the regulating valve is located on the sprayer, you may need to stop the operation to make adjustments.
To control the spray output manually as you speed up and slow down, you need to use a remote console that operates a flow meter or pump speed controller. Below you can see the basic setups.

In each case, you need a control console. These can be as simple as a pressure gauge, on/off switch, and pressure adjustment switch. Some also have a bank of switches for boom section valves.
With a regulating valve, your pump is running at the same rpm but you are adjusting how much flow is going to the boom or back to the tank via a bypass line. It can be plumbed, either way, the result is the same, you are changing the amount of flow to the boom. Increasing flow increases pressure and decreasing flow decreases pressure.
If you are going to use a simple controller, you need to adjust the pressure manually. You will need to calculate ahead of time what pressure is needed at different speeds to achieve your desired application rate. For automatic rate control, you need to have a speed input and a more sophisticated rate controller to adjust the pressure for you as you increase or decrease speed.
If you have a 12-volt pump on your sprayer, you can use a pump speed controller to vary the pump output instead of a regulating valve controlling your flow.
Flowmeter-Based Sprayer Plumbing
Flowmeter-based sprayer control systems are usually more complicated than pressure-based setups because they require a more advanced rate controller to “talk” to the flowmeter. A flowmeter-based system gives you “automatic” rate control because the rate controller adjusts your flow rate via the regulating valve to maintain your target GPA during operation. If you are looking for more details, be sure to read this post about setting up simple electronic sprayer controls.
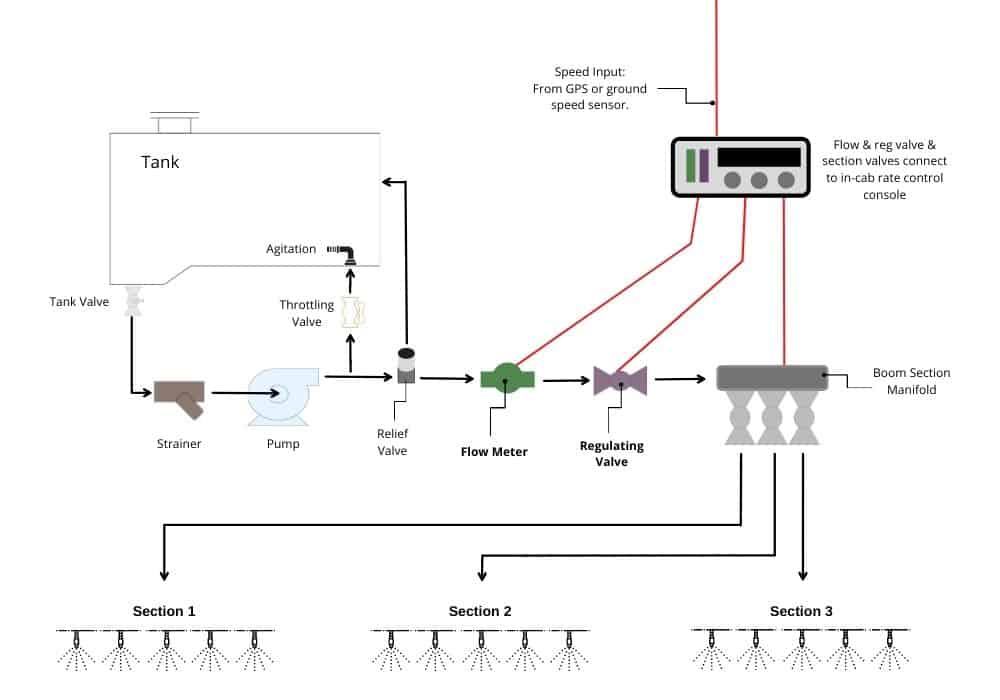
Where do you install the Sprayer Regulating Valve and Flowmeter?
There is usually some question about where to install the flow meter and regulating valve on a sprayer. The regulating valve can be plumbed in a bypass line, meaning you are regulating how much flow goes back to the tank. It can also be plumbed in line with the boom outlets valves and flowmeter.
Ag Sprayer Plumbing Keys to Remember
- Use a suction hose on the inlet side of the pump
- Ensure that the suction hose is adequately sized
- Protect your pump from debris in your tank with a strainer on the suction side.
- Protect the flowmeter with a strainer ahead of it. Internal pieces of pumps: diaphragms, rollers, impellers, etc can break and travel through your plumbing causing potential damage to your flowmeter.
- Use a discharge hose that is rated for your operating psi. The same goes for your plumbing fittings and clamps.
- Use a hose that is compatible with the chemicals/products you will be spraying. Most sprayer hoses have good chemical resistance but sometimes certain products may not interact well with certain types of hose. Example: EPDM hose and petroleum products.
If you are looking for more details on building a sprayer check out this post on how to build a DIY sprayer.
