Sprayers are used for commercial concrete sealing and for asphalt seal coating Are simple pieces of equipment. So if you are looking to build your own rig do not be intimidated. The list of components and steps for assembling them is straightforward. Let’s get started.
Seal Coat Sprayer Parts Selection
When it comes to the components that you use for your seal coat sprayer, there are many options that will work. Later in this post, I will provide a detailed list with specific components, but it is not a one-size-fits-all list. You might need a larger tank or prefer a different style of pump for your seal coat. Let’s take a look at the various options for the major components of a sealcoat sprayer and why you might want to select them.
Pump
The pump is a key component of the sprayer. Selecting the wrong pump can get you into trouble. There are two main pump types that are used on sealcoat equipment: centrifugal pumps and air-operated diaphragm pumps.
Centrifugal Pumps
Centrifugal pumps are a good choice for seal coating applications because they can handle abrasive liquids. They provide a continuous and consistent high flow of liquid. They are fairly economical compared with other types of pumps. They are easily bolted to a gas engine or hydraulic motor.
Due to the viscous and abrasive nature of sealcoat liquid, you we want to pumpConstructed with durable materials. Polypropylene pumps are the least expensive and they will work for a time, cast-iron palms with cast-iron or stainless steel impellers are recommended. Stainless steel is preferable if the sealer mixture that you were using is highly corrosive.
Centrifugal pumps utilize a mechanical seal around the drive shaft to keep it from leaking as the engine spins the impeller and shaft. The mechanical seal is subject to wear from abrasion, friction, and heat over time. Eventually, it will need to be replaced, especially when pumping seal coat liquid that has debris and particles in it. To prolong the life of the seal, never run the pump dry and flush with fresh water whenever possible.
A centrifugal pump provides you with a lot of flexibility due to a couple of specific characteristics they have. They are self-priming and they are not going to be damaged if you deadhead the pump.
Self-priming means the pump will pull liquid into it from a level below the pump inlet. This is advantageous because it offers flexibility when installing the pump. It does not need to. Be installed below the outlet on the tank.
In addition to this, a centrifugal pump can be deadheaded without harming the pump or the rest of the sprayer components. Meaning, if you close a discharge valve or the hose, wand, or nozzle is plugged, it will not cause damage. It is important to note that keeping a valve shut or leaving a nozzle clogged while the pump is running for a long period of time will create heat. The heat can potentially cause problems and lead to seal failure in the pump.
AODD Diaphragm Pumps

AODD Stands for air-operated double diaphragm pump. These pumps are versatile and Capable for handling a wide range of fluids. They Can handle abrasive and viscous liquids, making them ideal for seal coating applications. They are available with metal housings and Teflon diaphragms. They can handle thicker, more viscous material than a centrifugal pump.
AODD pumps are also self-priming and can run dry without causing any damage. You do not need to worry about your pump running when the tank is empty. Another advantage is that an AODD pump is “on-demand”, meaning that when you close the valve on your wand, the pump shuts off. When you open it it will start to pump again.
There are a couple of drawbacks with AODD pumps is that they pulse. The pair of diaphragms move back and forth as they pump, this results in an inconsistent flow of fluid. This can be helped with a pulsation dampener installed on the outlet of the pump.
The other factor is that they are typically going to be more expensive than a centrifugal pump of comparable size. Especially if you choose a pump with the expensive Teflon diaphragm. You will also need an air compressor that generates the necessary CFM for your pump and an air regulator. This all adds to the cost of getting your rig up and going.
Tank
The tank is obviously the largest component but it can be the simplest piece of the puzzle. There isn’t really a wrong type of tank to use but There are a few things to consider to avoid issues and make operating your sprayer easier.
- Center of Gravity: Most likely you will have your equipment mounted on a trailer. Be careful with how tall of a tank you use. A higher center of gravity can be harder to transport.
- Strength: Steel tanks are the most common. They are durable and strong. Poly tanks can also work. Be sure that the tank wall is rated to hold the weight of the liquid you are using.
- Agitation: Sealcoat needs to be agitated. This can be done by recirculating the liquid back into the tank with your pump, but to get the solid material off the bottom of the tank, mechanical agitation is may be necessary. This can be hard to install in a tank yourself so if you need internal paddles installed it can be more expensive.
- Access: Cleaning out the tank is vital to maintaining your sprayer. A tank needs a large manway to safely access the inside. You will also want to be sure that the outlet on your tank is large enough to provide adequate flow to your pump. For a 2-inch pump, you want at least a 2-inch opening.
Strainer
Clogging can be a major issue in sealcoat sprayers with all the sand and viscous liquids. Using a line strainer to filter out debris will help limit clogs in your nozzle and hose.
Strainers come in a wide range of filtration levels. They can be extremely fine to filter out most of the debris. This is good but a finer screen can clog easier and require you to clean it out more often. It can also potentially reduce the flow of your sprayer.
Strainers with a more coarse screen will only filter larger sediment and debris but they will not need to be cleaned out nearly as often and they work better with the thick viscous liquids used in seal coating.
2-inch “Y” strainers are going to work but you should not use a strainer that is finer than 20 mesh. Often, you will want a screen that is even more coarse than that. For more details take a look at this article on different strainers and screen mesh sizes.
Spray Nozzle/Tip
In order to do quality, professional work, you need to distribute the sealcoat liquid in an even layer. You won’t be able to accomplish this by simply spraying liquid out the end of a hose or spray wand. Getting an even consistent layer requires a flat fan spray nozzle.
Spray tips are a giant industry. There are so many available, that choosing one can be daunting. Fortunately for sealcoat work, we can boil down the tip you need to a few options.
Stainless steel tips might be the most durable, but they are more costly. Since your spray tips are likely going to clog up over time, you can use brass tips to save some cost and get the same results.
The spray nozzle size is crucial. There will be different sizes available in the same nozzle type. The nozzle will look the same and produce the same pattern but the volume of liquid that can pass through it at a given psi will change. If the nozzle is too small it will take too long to do your job. Choose a nozzle too large and you won’t be able to keep up the pace it takes to apply an even coat.
Most sealcoat machines operate at about 40-100 psi depending on the pump type and other settings (40 psi is common with centrifugal pumps, diaphragm pumps may operate at higher pressures). A fairly typical flow rate you will want from your nozzle is about 2-5 gallons per minute.
When identifying the right nozzle, consider the operating pressure of your sprayer, then find a nozzle that will produce the desired flow rate in GPM at that PSI. Selecting the exact size might take some testing to find out what size will work best for you. If nozzle sizing doesn’t make sense yet to you, take a look at this article that explains flat fan spray nozzles.
Sealcoat Sprayer Parts List
Hopefully, you now have a better understanding of the basic components needed for your sealcoat sprayer. Below is a parts list for a basic unit that utilizes a centrifugal pump. Again, there are many different variations of these components that you can use, but these are quality pieces that can be assembled to make a simple and reliable unit.
Centrifugal Pump Sealcoat Sprayer Parts:
- Steel tank – 150-300 gallons (this list assumes the tank has a 2-inch female national pipe thread outlet, but your tank may require different adapters).
- 2-inch steel close nipple x 5
- 2-inch brass ball valve x 3
- 2-inch part F camlock adapter (two-inch male pipe x 2-inch male cam-lock) x 2
- 2-inch part C camlock coupler (two-inch hose barb x 2-inch female cam-lock)
- 2-inch reinforced suction hose x 10 ft (you may need more, you might get by with less)
- 2-inch male national pipe thread x 2-inch hose barb fitting x 3
- 2-inch tee x 2
- 2-inch cam-lock cap
- 2-inch cast-iron pump and gas-engine unit
- 2-inch Y-strainer
- 2-inch x ¾-inch reducer bushing
- ¾-inch close nipple
- ¾-inch brass ball valve x 1
- ¾-inch male pipe thread x ¾-inch hose barb, brass or steel x 2
- ¾-inch discharge hose x 75-100 ft
- ¾-inch swivel, ¾ female x female national pipe thread
- ¾-inch pipe x 72-inches, aluminum or iron
- ¾-inch 90-degree elbow
- ¾-inch x ¼-inch bushing
- ¼-inch mpt x quick coupler
- Quick connect spray tip, 80 degree pattern
- Thread sealant
- Hose clamps
Diagram of Assembled Seal Coat Sprayer
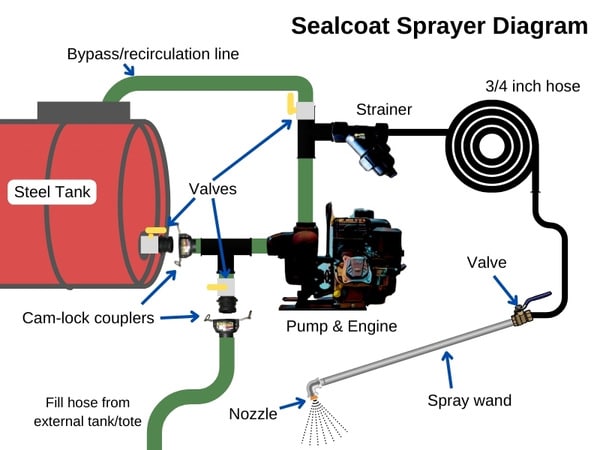
Sealcoat Sprayer Plumbing
Building the sprayer is Simple but it must be done correctly if you want the sprayer to perform and you don’t want to ruin your pump. The diagram above shows the basic layout and where each component should be installed. Let’s look at the basic steps and crucial factors to remember.
Step One: Begin by laying out the components on your truck or trailer. Every plumbing scenario will be different so you want to make sure things will fit together and have plenty of room to operate. Make sure there is room for hoses to be installed and valves to turn. This gives you a chance to make sure you can safely and easily access all the valves and engine controls.
The inlet plumbing will consist of the suction hose from the tank outlet to a 2-inch “tee”. This provides a way to either pull fluid from the tank for normal spraying or recirculation. It also allows you to pull liquid from an external tank, tote, or container to load your tank. This is done by closing the valve on the tank, connecting a fill hose, and opening the valve on the fill port.
Step Two: Install the hose barb fittings in your tank, pump, and strainer. The reinforced suction hose is used from the tank to the pump inlet. You can use solid pipe if you prefer. Be sure that when you install a fitting or hose, you can install the other end without issue.
For example, you won’t be able to install a threaded fitting into each end of the hose and then thread it into both the tank and pump because once you install one end you can no longer turn it. You will need to first install the barbs into the tank and pump, then slide the hose onto the barbs.
One way to make your plumbing easier is to use cam-lever couplings and manifold flange fittings in place of traditional pipe thread hose shanks. These fittings make connections much easier to install. It also lets you easily remove the hoses for storing, cleaning, replacement, or winterizing.
Sliding a hose onto a barb can be difficult. To make this easier you can use soapy water on the barb to lubricate the hose. You can also heat the hose to make it more pliable. Don’t forget to put your hose clamp on the hose before sliding it onto the barb!
Step Three: On the discharge side of the pump you will install another 2-inch tee. This will allow for liquid to return to the tank for loading and recirculating or to direct flow to your spray wand to apply the sealer.
A regulating/bypass valve is not required when using a centrifugal pump like the one used in this sprayer. However, a regulating/bypass valve is the only way to precisely control the operating pressure of your sprayer. If you are trying to get consistent results it can help to have control of the pressure so that you can determine what pressure produces the right flow rate and spray pattern that is most effective for you.
A useful tip is to install labels for the valves and components. This will be especially useful if you are Operating a business and need to train people often on how to operate the machine.
Before You Go
As mentioned earlier there isn’t one single way to plumb and fit pieces together. You will have to determine what works best for you. These are the most important factors to remember:
- Use a suction hose the same size as your pump.
- Use a strainer on the discharge side of the pump.
- Use components made from durable materials that will hold up the abrasive seal coat liquid.
Follow these tips and you can build an affordable and effective sealcoat sprayer yourself.
