It is always frustrating when you flip a switch and nothing happens. Especially when everything seems to be working fine. The salt in the case of the pump turning on the motor runs the pump sounds like it’s running fine, nothing is leaking, and yet nothing is coming out of the sprayer.
In this guide we will look at several different sprayer pump types and what you should do when they won’t prime.
Jump To Section on Your Pump Type:
What is Priming?
Priming a pump, in simple terms, means getting it ready to work efficiently by removing air from the pump and its intake pipe, and replacing it with the fluid that the pump is meant to move, such as water. This is crucial because most pumps are designed to move liquids, not air.
Related: What Does it Mean to Run a Sprayer Pump Dry?
When there’s air in the pump or the intake line, the pump can’t create the necessary vacuum to draw the liquid into the pump and then push it out. As a result, the pump might run, but it won’t effectively move the liquid, which means no pressure from your sprayer.
Many different types of pumps are used on sprayers and they use different mechanical means to create suction and generate flow. This means that depending on the type of pump you have, you may need to take a slightly different approach to determine why the pump won’t prime. Let’s look at the different types of sprayer pumps and what to do when they don’t prime.
What to do when a Centrifugal Sprayer Pump Won’t Prime
When a centrifugal sprayer pump fails to prime, it means the pump is not able to move the spraying fluid as intended, usually due to air trapped in the system or a lack of sufficient fluid reaching the pump inlet. To address this issue, follow these steps:
1. Check for Leaks
Inspect the pump and all connecting hoses for leaks. Even a small air leak can prevent the pump from priming. Look for cracks, holes, or loose connections and repair or replace as necessary.
2. Ensure Adequate Fluid Level
Make sure there is enough fluid in the supply tank and that the fluid level is above the pump. A low fluid level can cause the pump to draw in air instead of fluid.
3. Fill the Pump with Liquid
Manually fill the pump casing and the suction line with the fluid to be pumped. This helps to create the initial vacuum needed for the pump to start pulling the fluid. This article shows in more detail how fluid helps to prime the pump.
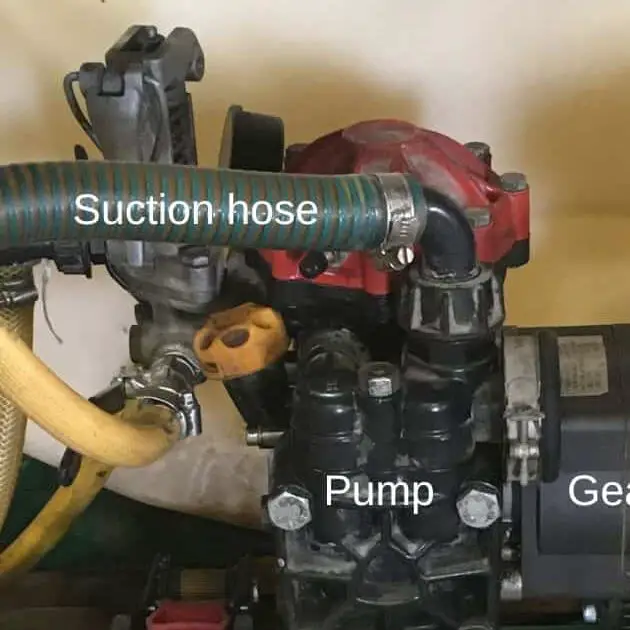
4. Check the Suction Line
Ensure the suction line is not too long or too small (inside diameter). The suction hose or pipe size should atleast match the inlet size of the pump. Pipe or hose that has a smaller inside diameter can restrict flow and make it difficult for the pump to prime. It can also cause damage to the pump. Also, check for any blockages in the suction line or filter and clear them.
5. Inspect the Foot Valve
If your system uses a foot valve (a check valve at the end of the suction line, submerged in the fluid), make sure it is functioning correctly. A faulty foot valve can allow fluid and pressure to escape, making priming difficult.
6. Check for Air Entrapment Points
Air can be trapped in certain parts of the suction plumbing. Specifically at high points in the piping that is above the pump itself. Any point where the pipe or hose makes an upside-down “U” shape can trap air. Make sure these points are properly vented to allow air to escape.
In some instances, you can bleed air out of these lines with the pump running and it will begin to prime. For more information on how to do this read our guide to troubleshooting sprayer pumps.
7. Evaluate the Impeller and Seals
Wear and tear on the impeller or seals can reduce the pump’s efficiency, making it difficult to prime. Inspect these components for damage or wear and replace if necessary.
8. Prime Again
After addressing any issues, try to prime the pump again. This may involve manually filling the pump with liquid again and starting the pump with the outlet valve slightly closed to increase pressure and help with priming.
9. Seek Professional Help
If the pump still fails to prime after these steps, it might indicate a more complex issue. In this case, consulting with a professional or the manufacturer’s technical support can provide further diagnostics and solutions.
These steps can help troubleshoot and resolve common issues that prevent a centrifugal sprayer pump from priming, ensuring it operates efficiently for your spraying needs.
What to do when a Diaphragm Sprayer Pump Won’t Prime
When dealing with a diaphragm pump, such as the Hypro 9910-D30, that won’t prime, the approach is somewhat different from centrifugal pumps due to the way they operate. Diaphragm pumps are positive displacement pumps, which are generally self-priming, but issues can still arise. Here’s what to do:
1. Check the Supply Tank
Ensure there’s enough fluid in the tank and that the pump is properly aligned with the tank. The fluid level should be at or above the pump level to aid gravity feeding.
2. Inspect the Suction Line
Verify that the suction line is properly connected and free of leaks. Any air leak in the suction hose or fittings can prevent the pump from priming. Ensure all connections are tight and the hose has no cracks or holes.
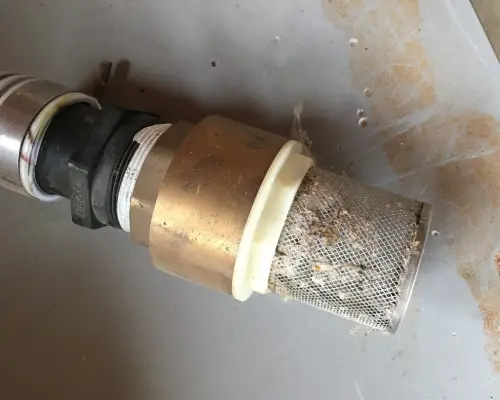
Strainers/filters in the suction line are notorious for having air leaks. A missing oring or a strainer bowl that is not properly connected will let in air and affect priming.
3. Evaluate the Suction Plumbing for Blockages
Make sure the suction hose is not clogged with debris. A blocked suction line will prevent the pump from drawing fluid. Cleaning or replacing the suction hose may be necessary if a blockage is found.
Check strainers/filters that are plumbed into the suction side of the pump. A dirty strainer with a lot of debris or residue can harm the pump’s ability to prime.
4. Check the Diaphragms and Valves
The diaphragms and valves are crucial for the pump’s operation. If a diaphragm is torn or a valve is damaged or blocked by debris, the pump may not prime. Inspect these components and clean or replace them as needed.
For more details on the valves and diaphragms, take a look at this full guide on diaphragm pump troubleshooting.
6. Release Trapped Air
Air trapped inside the pump can prevent priming. Look for a bleed valve or loosen the outlet valve to release any trapped air in the system as the pump starts.
7. Adjust the Pressure Relief Valve
If your pump is equipped with a pressure relief or bypass valve, ensure it is set correctly. An improperly adjusted valve can affect the pump’s ability to prime and operate. Generally, for most diaphragm pumps, the regulating control needs to be set in the “full bypass” mode.
You can find more details in this guide that explains the regulating control units for diaphragm pumps.
9. Refer to the Manual
Consult the pump’s manual for specific priming instructions and troubleshooting tips tailored to your specific diaphragm pump. Manufacturers often provide model-specific guidance that can be very helpful.
10. Get Help
If you still have no luck after these steps, then be sure to consult a mechanic or technician for further help.
These steps focus on common issues that can prevent a diaphragm pump from priming, helping to diagnose and resolve the problem effectively.
What to Do When a Roller Pump Won’t Prime
When a roller pump fails to prime, it’s often due to air pockets within the pump or its intake line, or issues with the components that prevent the pump from creating enough suction to draw in the fluid. Here’s how to troubleshoot and resolve priming issues with a roller pump:
1. Check the Fluid Level
As with other pump types, ensure the fluid level in the supply tank is sufficient and that the tank is positioned appropriately relative to the pump to facilitate easy flow. The pump should not have to work against gravity to pull fluid.
2. Inspect for Leaks in the Suction Line
Any air leaks in the suction line or at the pump’s inlet can prevent priming. Check all connections, hoses, and fittings for tightness and integrity. Replace or repair any parts where leaks are found.
Small cracks in hoses can be enough to hurt the ability of the pump to prime. Thoroughly examine the hose as closely as possible.
3. Prime the Pump Manually
If the pump is not self-priming, you may need to manually prime it by filling the pump housing and suction line with the liquid to be pumped. This helps to eliminate air from the system and facilitates the creation of a vacuum.
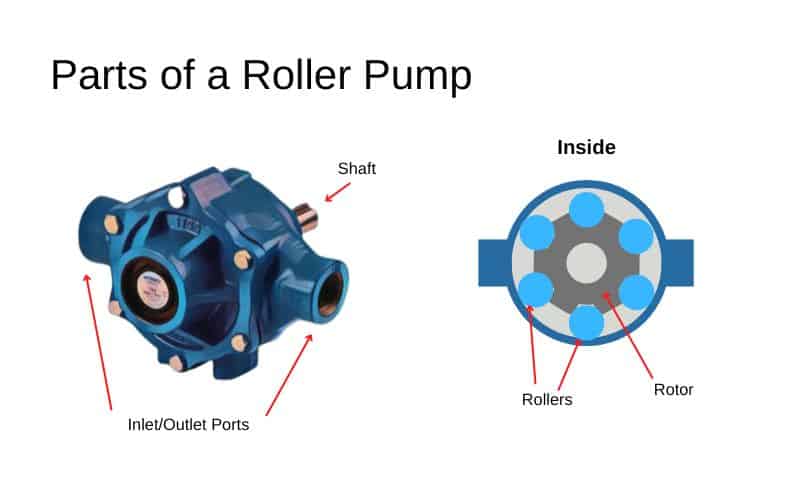
4. Examine the Rollers and Seals
Wear or damage to the rollers, seals, or the inside of the pump housing can affect the pump’s ability to prime. Inspect these components for signs of wear or damage and replace them as necessary.
Rollers can also get stuck inside the pump. This obviously will stop the pump from priming.
5. Clear Blockages
Check the suction line, filter (if installed), and pump inlet for blockages. Remove any debris or sediment that could be hindering fluid flow.
6. Ensure Proper Assembly
If the pump has been recently serviced or assembled, ensure that all components have been correctly installed and that the pump assembly is tight and secure.
8. Check the Rotation Direction
For roller pumps driven by a PTO, ensure the drive is rotating in the correct direction. Incorrect rotation will prevent the pump from priming and operating correctly.
9. Adjust the Speed
If the pump is being operated at too low a speed, it may not generate enough centrifugal force to prime. Increasing the drive speed can help, but be sure to stay within the recommended operating range for the pump.
10. Consult the Manual
Refer to the manufacturer’s manual for specific troubleshooting tips and instructions for your pump model. Some pumps may have unique features or requirements for priming.
11. Seek Professional Advice
If after these steps the pump still fails to prime, the issue may be more complex. Consulting with a professional or the manufacturer’s technical support can provide further diagnostics and solutions.
Addressing these points can help identify and resolve common issues that prevent a roller pump from priming, ensuring it operates effectively for your application.
What to Do Whan a 12-Volt Diaphragm Pump Won’t Prime
A 12-volt diaphragm pump not priming on a sprayer can be due to several issues, similar to those affecting other types of pumps. These pumps do have an electric aspect that may be the culprit. Here’s a step-by-step approach to troubleshoot and resolve the issue:
1. Check the Power Supply
Ensure the pump is receiving power. Check the battery voltage to ensure it’s fully charged and providing sufficient power. Inspect all electrical connections for corrosion, looseness, or damage. Ensure the switch and any circuit protection (fuses or circuit breakers) are functional.
You can learn in this guide that covers the electrical aspects of 12-volt sprayer pumps.
2. Inspect for Leaks in the Suction Line
Air leaks in the suction line are a common cause of priming issues. Inspect all hoses, connections, and fittings for tightness and integrity. Even a small air leak can prevent the pump from priming properly.
3. Ensure Sufficient Fluid in the Tank
The fluid level in the tank should be high enough to provide a positive flow to the pump. Low fluid levels can introduce air into the system and prevent priming.
4. Prime the Pump Manually
If possible, manually fill the pump and suction line with the fluid to be pumped. This helps eliminate air from the system and facilitates the creation of a vacuum necessary for priming.
5. Check the Suction Line for Blockages or Restrictions
Ensure the suction line is clear of any blockages or restrictions. Clean or replace the line if necessary. Also, check that any filters in the line are clean and unobstructed.
6. Inspect the Diaphragm and Valves
Wear, damage, or debris on the diaphragm or in the valves can prevent the pump from creating a proper vacuum. Inspect these components and clean or replace them as needed.

We have a lot more info on this topic in this 12-volt sprayer troubleshooting guide.
7. Release Trapped Air
Air trapped in the pump or system can prevent priming. If your pump has a bleed valve, use it to release trapped air. Otherwise, loosening a fitting on the outlet side of the pump briefly may help release trapped air.
8. Check the Pump’s Orientation and Installation
Ensure the pump is installed correctly according to the manufacturer’s specifications. Incorrect installation can lead to issues with priming.
Learn more in this article about hooking up sprayer pumps.
9. Consult the User Manual
Refer to the pump’s user manual for specific priming instructions and troubleshooting tips. Manufacturers often provide model-specific guidance that can be very helpful.
10. Verify Hose Connections and Fittings
Make sure all hoses and fittings are appropriate for the pump and securely attached. Incorrect or loose fittings can introduce air into the system.
11. Contact Technical Support
If you’ve gone through these steps and the pump still won’t prime, there may be a more complex issue at hand. Contact the manufacturer’s technical support for assistance. They can provide detailed advice and support specific to your pump model.
Addressing these points systematically can help you identify and resolve the issue with a 12-volt diaphragm pump not priming on a sprayer, ensuring it operates efficiently for your needs.
